Videos
Click to Play Video

|
This Old House | The Dorchester House [S1, E1] | Full Episode
Jul 08, 2019
We're just 40 days away from our big 40th-anniversary TV special on PBS! In the meantime, take a stroll down memory lane with Bob Vila, touring our very first turn-of-the-century house in Dorchester, MA.
#ThisOldHouse #AskTOH
SUBSCRIBE to This Old House: bit.ly/ SubscribeThisOldHouse
This series premiere episode is available FREE for a limited time in celebration of TOH's 40th anniversary! To view the rest of Season 1, get a FREE trial membership to TOH INSIDER. bit.ly/ 2XEaAPf
In this episode:
Host Bob Vila welcomes us to Dorchester, MA, and the series This Old House. The series will reveal the many steps involved in rehabbing an old house into a family home. Rehabbing is a combination of restoring and renovating, from demolition to decoration. This single-family residence was built around 1860 in a style that was very popular in the Victorian era.
Real estate appraiser John Hewitt helps Bob appraise the house. They survey the condition of the exterior, including the mansard roof, clapboards, windows, gutters, garage, and foundation. They assess whether or not the features are worth repairing or replacing. The house is situated on a quarter acre of land next to Saint Peter's church, which was built in 1870, and across the street from the first meetinghouse of Boston. Thirty years ago, the owner, a doctor, built a new entrance, which is in good shape.
Inside, they look at the condition of each room. The ceilings are in poor shape and will need to be replaced. The fireplaces can be cleaned and repaired. The woodwork all matches in the old entryway and can be kept. The kitchen is a good size but will need a complete makeover. The bedrooms on the second floor are large and sunny. The bathroom is a disaster. The third floor is partly redone, and a caretaker will occupy it while the home is being rehabbed. John appraises the home for $16,000 to $17,000 in its current condition.
Real estate broker John Crosby describes the home's biggest selling points as well as the weaknesses.
Down in the basement, John Hewett assesses the condition of the copper pipes and a crawl space under the kitchen. The electrical box needs a major update for safety. The heating system needs to be replaced.
About This Old House TV:
This Old House is the No. 1 multimedia home enthusiast brand, offering trusted information and expert advice through award-winning television, a highly regarded magazine, and an information-driven website. This Old House and Ask This Old House are produced by This Old House Ventures, LLC and are presented on PBS by WGBH Boston.
Follow This Old House and Ask This Old House:
Facebook: bit.ly/ ThisOldHouseFB
Twitter: bit.ly/ ThisOldHouseTwitter
bit.ly/ AskTOHTwitter
Pinterest: bit.ly/ ThisOldHousePinterest
Instagram: bit.ly/ ThisOldHouseIG
Instagram: www.instagram.com/ asktoh/
Tumblr: bit.ly/ ThisOldHouseTumblr
The Dorchester House
www.thisoldhouse.com/ watch/ dorchester-house-tour-house
Tags:
|
Length: |
min.
|
|
Category: |
|
|
Rating: | 0.00
|
|
|
|
Click to Play Video
|
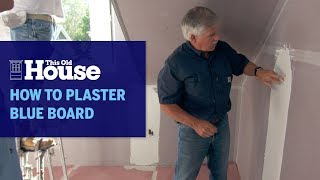
How to Plaster Blue Board | This Old House
Jul 08, 2019
Tom Silva shows Kevin O'Connor the differences between drywall installation and plastering over blue board.
#ThisOldHouse #AskTOH
SUBSCRIBE to This Old House: bit.ly/ SubscribeThisOldHouse
General contractor Tom Silva shows host Kevin O'Connor the differences between drywall installation and plastering over blue board.
For quick and cheap wall surfaces, drywall is often the solution. But some builders, Tom Silva included, still like plaster. Tommy explains the difference between drywall installation and plastering blue board.
About This Old House TV:
This Old House is the No. 1 multimedia home enthusiast brand, offering trusted information and expert advice through award-winning television, a highly regarded magazine, and an information-driven website. This Old House and Ask This Old House are produced by This Old House Ventures, LLC and are presented on PBS by WGBH Boston.
Follow This Old House and Ask This Old House:
Facebook: bit.ly/ ThisOldHouseFB
Twitter: bit.ly/ ThisOldHouseTwitter
bit.ly/ AskTOHTwitter
Pinterest: bit.ly/ ThisOldHousePinterest
Instagram: www.instagram.com/ asktoh/
Tumblr: bit.ly/ ThisOldHouseTumblr
How to Plaster Blue Board
www.youtube.com/ user/ thisoldhouse/
This Old House, Ask This Old House, DIY, Home Improvement, DIY Ideas, Renovation, Renovation Ideas, How To Fix, How To Install, How To Build, Tom Silva, Kevin O'Connor, Jamestown Net-Zero, plaster, blue board, drywall
Full episode:
Powering Net Zero | The Jamestown Net-Zero House
www.thisoldhouse.com/ watch/ powering-net-zero-jamestown-net-zero-house
Tags:
|
Length: |
min.
|
|
Category: |
|
|
Rating: | 0.00
|
|
|
|
Click to Play Video

|
How to Install Wood Shingles | This Old House
Jul 07, 2019
Tom Silva shows the apprentices how to properly install wood shingles.
#ThisOldHouse #AskTOH
SUBSCRIBE to This Old House: bit.ly/ SubscribeThisOldHouse
The roof has been insulated and now it’s time to nail in the shingles. General contractor Tom Silva shows the apprentices how to properly install wood shingles. Before they start, they staple a nylon matrix to the roof sheathing to prevent the shingles from rotting and cupping. Then Tom shows the apprentices how to layer and space the first course of shingles.
About This Old House TV:
This Old House is the No. 1 multimedia home enthusiast brand, offering trusted information and expert advice through award-winning television, a highly regarded magazine, and an information-driven website. This Old House and Ask This Old House are produced by This Old House Ventures, LLC and are presented on PBS by WGBH Boston.
Follow This Old House and Ask This Old House:
Facebook: bit.ly/ ThisOldHouseFB
Twitter: bit.ly/ ThisOldHouseTwitter
bit.ly/ AskTOHTwitter
Pinterest: bit.ly/ ThisOldHousePinterest
Instagram: www.instagram.com/ asktoh/
Tumblr: bit.ly/ ThisOldHouseTumblr
How to Install Wood Shingles
www.youtube.com/ user/ thisoldhouse/
This Old House, Ask This Old House, DIY, Home Improvement, DIY Ideas, Renovation, Renovation Ideas, How To Fix, How To Install, How To Build, Tom Silva, roofing, wood shingles, installation, GenerationNext, apprentices, Jamestown Net-Zero
Full episode:
Modern Barn Raising | The Jamestown Net-Zero House
www.thisoldhouse.com/ watch/ modern-barn-raising-jamestown-net-zero-house
Tags:
|
Length: |
min.
|
|
Category: |
|
|
Rating: | 0.00
|
|
|
|
Click to Play Video

|
How to Match a Paint Color | Ask This Old House
Jul 05, 2019
Ask This Old House painter Mauro Henrique demonstrates how to accurately match a paint color.
#ThisOldHouse #AskTOH
SUBSCRIBE to This Old House: bit.ly/ SubscribeThisOldHouse
Time: 1-2 hours
Cost: $50
Skill Level: Beginner
Tools List for Matching Paint Color:
Utility knife [amzn.to/ 2X4RMbw]
Shopping List:
Paint [amzn.to/ 2X1YNdd]
Paint chips [amzn.to/ 2RyCmv3]
Steps:
1. Start by checking the basement or the garage in case the previous homeowners left it behind. If you can locate a can, it should have the color noted on the lid.
2. Try holding paint chips up to the wall to see if you can get a close match, though it’s unlikely you’ll be successful with this method. This is a ton of work and requires a back and forth between the paint store and the room being painted.
3. Cut out a small sample of the wall in a low visibility area, like behind a couch or near an outlet. With drywall, it’s easy to cut the paper on the face of the drywall and that can be patched later.
4. Take the paint sample to the home center or a paint store. Most locations have a color matching scanner that can closely reproduce the color of the chip.
5. Patch and then paint over the chunk cut out for the color scanning.
6. Paint the wall or areas requiring touchups as originally planned. The darker the color, the more likely it will be that you will have to paint the whole wall or even the whole room, since dark colors are near impossible to match.
7. Once painting is complete, save the can or keep a good record of the paint used to paint the room so you don’t have to color match again.
Resources:
To match a paint color, Mauro recommends cutting a small section of the paint away to create a chip to then bring to a home center or paint store to be color matched. Utility knives can be found at home centers and almost every home center is capable of color matching a paint sample.
Expert assistance with this segment was provided by Mauro’s Painting (www.maurospainting.com).
About Ask This Old House TV:
Homeowners have a virtual truckload of questions for us on smaller projects, and we're ready to answer. Ask This Old House solves the steady stream of home improvement problems faced by our viewers—and we make house calls! Ask This Old House features some familiar faces from This Old House, including Kevin O'Connor, general contractor Tom Silva, plumbing and heating expert Richard Trethewey, and landscape contractor Roger Cook.
Follow This Old House and Ask This Old House:
Facebook: bit.ly/ ThisOldHouseFB
Twitter: bit.ly/ ThisOldHouseTwitter
bit.ly/ AskTOHTwitter
Pinterest: bit.ly/ ThisOldHousePinterest
Instagram: bit.ly/ ThisOldHouseIG
Tumblr: bit.ly/ ThisOldHouseTumblr
www.instagram.com/ asktoh/
How to Match a Paint Color
www.youtube.com/ user/ thisoldhouse/
This Old House, Ask This Old House, DIY, Home Improvement, DIY Ideas, Renovation, Renovation Ideas, How To Fix, How To Install, How To Build, Mauro Henrique, Kevin O'Connor, painting, paint color, color matching
Full episode:
Historic Plantings, Wood Utensils | Ask TOH
www.thisoldhouse.com/ watch/ historic-plantings-wood-utensils-ask-toh
Tags:
|
Length: |
min.
|
|
Category: |
|
|
Rating: | 0.00
|
|
|
|
Click to Play Video

|
Crooked Chimney | Home Inspection Nightmares | Ask This Old House
Jul 03, 2019
Ask This Old House host Kevin O’Connor, general contractor Tom Silva, plumbing and heating expert Richard Trethewey, mason Mark McCullough, and carpenter Nathan Gilbert share more home inspection nightmares.
#ThisOldHouse #AskTOH
SUBSCRIBE to This Old House: bit.ly/ SubscribeThisOldHouse
Steps:
1. Tom starts with a roof that has shingles installed sideways.
2. Richard then shares a tiled shower with no drain.
3. Finally, Mark shares a chimney that’s installed crooked.
Resources:
Expert assistance with this segment was provided by the American Society of Home Inspectors (ASHI) (www.homeinspector.org/ ).
About Ask This Old House TV:
Homeowners have a virtual truckload of questions for us on smaller projects, and we're ready to answer. Ask This Old House solves the steady stream of home improvement problems faced by our viewers—and we make house calls! Ask This Old House features some familiar faces from This Old House, including Kevin O'Connor, general contractor Tom Silva, plumbing and heating expert Richard Trethewey, and landscape contractor Roger Cook.
Follow This Old House and Ask This Old House:
Facebook: bit.ly/ ThisOldHouseFB
Twitter: bit.ly/ ThisOldHouseTwitter
bit.ly/ AskTOHTwitter
Pinterest: bit.ly/ ThisOldHousePinterest
Instagram: bit.ly/ ThisOldHouseIG
Tumblr: bit.ly/ ThisOldHouseTumblr
www.instagram.com/ asktoh/
Home Inspection Nightmares | Crooked Chimney
www.youtube.com/ user/ thisoldhouse/
This Old House, Ask This Old House, DIY, Home Improvement, DIY Ideas, Renovation, Renovation Ideas, How To Fix, How To Install, How To Build, Home Inspection Nightmares, chimney, roof, shower, Kevin O'Connor, Tom Silva, Richard Trethewey, Mark McCullough, Nathan Gilbert
Full episode:
Historic Plantings, Wood Utensils | Ask TOH
www.thisoldhouse.com/ watch/ historic-plantings-wood-utensils-ask-toh
Tags:
|
Length: |
min.
|
|
Category: |
|
|
Rating: | 0.00
|
|
|
|
Click to Play Video

|
How to Plant a Victorian Garden | Ask This Old House
Jul 01, 2019
Ask This Old House landscape designer Jenn Nawada helps a homeowner add some curb appeal using Victorian plants to match the design of his house
#ThisOldHouse #AskTOH
SUBSCRIBE to This Old House: bit.ly/ SubscribeThisOldHouse
Time: 3-4 hours
Cost: $500
Skill Level: Beginner
Tools List for Planting a Victorian Garden:
Hose (or flexible line) [amzn.to/ 2NbMNpK]
Grub hoe [amzn.to/ 2X6WTNa]
Edging shovel [amzn.to/ 2xff04g]
Digging shovel [amzn.to/ 2XzOpxt]
Rake [amzn.to/ 2Xx4RhP]
Shopping List:
Spray paint [amzn.to/ 2X6N55F]
Victorian plants [amzn.to/ 2X3UAdC]
Compost [amzn.to/ 2Nc7d1L]
Starter fertilizer [amzn.to/ 2X3kdeK]
Mulch [amzn.to/ 2FvkDQ4]
Steps:
1. Use a hose or another bendable material to outline the shape of the garden. Jenn recommends playing off features of the house and allowing the garden to go far away from the house for added depth. Once the garden has the right shape, use some spray paint to mark the lines.
2. Dig out the grass and weeds in the area using the grub hoe. For the edges, cut down using the edging shovel. This should allow for the garden to have a sharp, clean line to define the edge.
3. Stage the desired plants throughout the garden. For a Victorian garden, Jenn likes to incorporate symmetry. Choose plants like boxwoods, hydrangeas, lilacs, viburnums, rose of sharons, and azaleas to complement the house style.
4. Plant everything. Dig the holes twice as wide and about as deep as the root ball with the digging shovel. Add some compost in the holes before dropping in the plants for added nutrients. Tease the roots slightly before putting each plant in place. Backfill each hole and add a little starter fertilizer around each plant.
5. Add a thin layer of mulch over all the plants to keep out weeds and help retain moisture. Use a rake to help spread the mulch throughout the garden.
6. Give the plants a good watering.
Resources:
Jenn installed a variety of plants that she felt were appropriate for a 1900s Victorian. These included green mountain boxwoods, green velvet boxwoods, limelight hydrangeas, viburnums, rose of sharons, and azaleas. These can all be found at nurseries.
Expert assistance with this project was provided by Nawada Landscape Design (www.nawadalandscapedesign.com) and Forever Green Landscaping (www.forevergreenlandscaping.net/ ).
About Ask This Old House TV:
Homeowners have a virtual truckload of questions for us on smaller projects, and we're ready to answer. Ask This Old House solves the steady stream of home improvement problems faced by our viewers—and we make house calls! Ask This Old House features some familiar faces from This Old House, including Kevin O'Connor, general contractor Tom Silva, plumbing and heating expert Richard Trethewey, and landscape contractor Roger Cook.
Follow This Old House and Ask This Old House:
Facebook: bit.ly/ ThisOldHouseFB
Twitter: bit.ly/ ThisOldHouseTwitter
bit.ly/ AskTOHTwitter
Pinterest: bit.ly/ ThisOldHousePinterest
Instagram: bit.ly/ ThisOldHouseIG
Tumblr: bit.ly/ ThisOldHouseTumblr
www.instagram.com/ asktoh/
How to Plant a Victorian Garden
www.youtube.com/ user/ thisoldhouse/
This Old House, Ask This Old House, DIY, Home Improvement, DIY Ideas, Renovation, Renovation Ideas, How To Fix, How To Install, How To Build, Jenn Nawada, landscaping, garden, Victorian
Full episode:
Historic Plantings, Wood Utensils | Ask TOH
www.thisoldhouse.com/ watch/ historic-plantings-wood-utensils-ask-toh
Tags:
|
Length: |
min.
|
|
Category: |
|
|
Rating: | 0.00
|
|
|
|
Click to Play Video

|
Hand Carved Utensils | Build It | Ask This Old House
Jun 30, 2019
Ask This Old House general contractor Tom Silva and host Kevin O’Connor hand carve wooden serving utensils using leftover pine from a previous Build It project.
#ThisOldHouse #AskTOH
SUBSCRIBE to This Old House: bit.ly/ SubscribeThisOldHouse
Time: 2-3 hours
Cost: $50
Skill Level: Beginner
Tools List for Building Wooden Utensils:
Pencil [amzn.to/ 2WZ6p00]
Scissors [amzn.to/ 2J460Ex]
Japanese pull saw [amzn.to/ 2X4CUi5]
Coping saw [amzn.to/ 2WXBilm]
Rasp [amzn.to/ 2XvUbjO]
Spoke shave [amzn.to/ 2Xzg15O]
Curved gouge [amzn.to/ 2XuwlF3]
Rags [amzn.to/ 2RA3ae4]
Shopping List:
Paper [amzn.to/ 2Yef3sP]
Wood [amzn.to/ 2FvBzWU]
Sandpaper [amzn.to/ 2RApd4y]
Tack cloth [amzn.to/ 2Nf7cKv]
Food grade wood conditioner [amzn.to/ 2NbSpQQ]
Steps:
1. Trace out an outline of the utensils on a piece of paper and cut it out to use as a template on the wood.
2. Place the paper template on the scrap wood being used for the utensils. Trace the outline over a decent section of the wood with straight grain and no knots.
3. Cut the scrap wood into a workable piece using the cross-cutting side of a Japanese pull saw.
4. While still using the Japanese pull saw, make relief cuts along the outline of the utensils. This will make the wood easier to cut later on.
5. Make a rough thickness cut using the Japanese pull saw so that the utensils are roughly the desired depth. This can be fine-tuned later.
6. Use the coping saw to cut out the outline of the utensil. The relief cuts should make this step easier.
7. Start fine-tuning the shape of each utensil using a variety of hand tools. The spoke shave is good for the handle, and the rasp is a little better for the head of the utensil.
8. Scoop out the heads of each utensil using a curved gouge. Using the gouge, work your way to the lowest point of the utensil in the center and then come back up. Work all the way around the head of each utensil to give the curve a unified look.
9. Sand the utensils smooth using 80, 120, and 240 grit sandpaper.
10. Wipe down the utensils with a tack cloth.
11. Apply a food grade wood finish using a rag.
Resources:
Tom and Kevin carved the utensils out of some leftover Southern white pine that they used for Build It | Wine Rack, which can be viewed here. [youtu.be/ dFgE9KJao3w]
To cut and carve the spoon and fork, Tom picked out a variety of hand carving tools, including a carving gouge, spoke shave, a couple different rasps, a coping saw, a Japanese pull saw, and a hand plane. Some of these tools can be found at home centers, but it will be easier to locate them all at specialty woodworking shops.
The sandpaper Tom and Kevin used to smooth down the utensils can be found at home centers.
To finish the utensils, Tom and Kevin applied a Butcher Block Conditioner [amzn.to/ 2WZuRhP], which is manufactured by Howard Products and can be found at home centers.
About Ask This Old House TV:
Homeowners have a virtual truckload of questions for us on smaller projects, and we're ready to answer. Ask This Old House solves the steady stream of home improvement problems faced by our viewers—and we make house calls! Ask This Old House features some familiar faces from This Old House, including Kevin O'Connor, general contractor Tom Silva, plumbing and heating expert Richard Trethewey, and landscape contractor Roger Cook.
Follow This Old House and Ask This Old House:
Facebook: bit.ly/ ThisOldHouseFB
Twitter: bit.ly/ ThisOldHouseTwitter
bit.ly/ AskTOHTwitter
Pinterest: bit.ly/ ThisOldHousePinterest
Instagram: bit.ly/ ThisOldHouseIG
Tumblr: bit.ly/ ThisOldHouseTumblr
www.instagram.com/ asktoh/
Build It | Hand Carved Utensils
www.youtube.com/ user/ thisoldhouse/
This Old House, Ask This Old House, DIY, Home Improvement, DIY Ideas, Renovation, Renovation Ideas, How To Fix, How To Install, How To Build, Build It, Tom Silva, Kevin O'Connor, woodworking, wooden utensils
Full episode:
Historic Plantings, Wood Utensils | Ask TOH
www.thisoldhouse.com/ watch/ historic-plantings-wood-utensils-ask-toh
Tags:
|
Length: |
min.
|
|
Category: |
|
|
Rating: | 0.00
|
|
|
|
Click to Play Video

|
Smart Water Valve | Future House | Ask This Old House
Jun 26, 2019
Ask This Old House home technology expert Ross Trethewey travels to Los Angeles to learn about innovations being made to automatic water shutoff valves
#ThisOldHouse #AskTOH
SUBSCRIBE to This Old House: bit.ly/ SubscribeThisOldHouse
Resources:
While automatic water shutoff valves have been around for quite some time, there are a number of different companies that are now modifying the units to make them smart devices.
In this segment, Ross learned about the functions of a Flo by Moen [amzn.to/ 2IoUvZi] automatic water shutoff valve. During the discussion afterwards, Ross and Richard also talked about the Phyn [amzn.to/ 2WQPNaC] automatic water shutoff valve, which is a similar device in the smart automatic water shutoff valve space.
About Ask This Old House TV:
Homeowners have a virtual truckload of questions for us on smaller projects, and we're ready to answer. Ask This Old House solves the steady stream of home improvement problems faced by our viewers—and we make house calls! Ask This Old House features some familiar faces from This Old House, including Kevin O'Connor, general contractor Tom Silva, plumbing and heating expert Richard Trethewey, and landscape contractor Roger Cook.
Follow This Old House and Ask This Old House:
Facebook: bit.ly/ ThisOldHouseFB
Twitter: bit.ly/ ThisOldHouseTwitter
bit.ly/ AskTOHTwitter
Pinterest: bit.ly/ ThisOldHousePinterest
Instagram: bit.ly/ ThisOldHouseIG
Tumblr: bit.ly/ ThisOldHouseTumblr
www.instagram.com/ asktoh/
Future House | Smart Water Valve
www.youtube.com/ user/ thisoldhouse/
This Old House, Ask This Old House, DIY, Home Improvement, DIY Ideas, Renovation, Renovation Ideas, How To Fix, How To Install, How To Build, future house, ross trethewey, smart technology, plumbing, water shutoff valve, richard trethewey
Full episode:
Deck Staining, Water Monitoring | Ask TOH
www.thisoldhouse.com/ watch/ deck-staining-water-monitoring-ask-toh
Tags:
|
Length: |
min.
|
|
Category: |
|
|
Rating: | 0.00
|
|
|
|
Click to Play Video

|
The Correct Way to Build a Fire in a Fireplace | Ask This Old House
Jun 28, 2019
Ask This Old House mason Mark McCullough demonstrates the best way to build a fire in order to prevent smoke from filling up the room
#ThisOldHouse #AskTOH
SUBSCRIBE to This Old House: bit.ly/ SubscribeThisOldHouse
Time: 5 minutes
Cost: $0
Skill Level: Beginner
Shopping List:
Hardwood or Seasoned Wood [amzn.to/ 31IjPRm]
Kindling [amzn.to/ 2XnLdF4]
Paper [amzn.to/ 2IQlPi8]
Steps:
1. Start by crumbling up some paper or newspaper and place it loosely underneath the grate.
2. Take two of the biggest logs and place them parallel with the back of the fireplace on top of the grate. Leave space between them for the flames to reach up over the logs.
3. Take some of the smaller logs and place them perpendicular on top of the bigger logs.
4. Place the kindling on top of the smaller logs in a loose pile.
5. Prime the chimney by lighting one of the pieces of paper on fire with a match or lighter and hold it up in the chimney. This should start an up draft to ensure the smoke will rise right away.
6. If the paper is long enough and it’s still safe to do so, use that same paper to light the pile of paper underneath the grate.
7. Place the burning paper on top of the kindling. This should create a strong draft that will keep the smoke in the chimney and out of the house.
Resources:
All the materials Mark used to build the fire in his fireplace were found either around the house or in the backyard. The only thing Mark cautions against is burning pine and other softwoods in the fireplace, as it can cause creosote to build up in the chimney which could eventually result in a dangerous chimney fire. Seasoned hardwood is best to use in a fireplace.
Expert assistance with this segment was provided by MJM Masonry (www.mjmmasonry.com).
About Ask This Old House TV:
Homeowners have a virtual truckload of questions for us on smaller projects, and we're ready to answer. Ask This Old House solves the steady stream of home improvement problems faced by our viewers—and we make house calls! Ask This Old House features some familiar faces from This Old House, including Kevin O'Connor, general contractor Tom Silva, plumbing and heating expert Richard Trethewey, and landscape contractor Roger Cook.
Follow This Old House and Ask This Old House:
Facebook: bit.ly/ ThisOldHouseFB
Twitter: bit.ly/ ThisOldHouseTwitter
bit.ly/ AskTOHTwitter
Pinterest: bit.ly/ ThisOldHousePinterest
Instagram: bit.ly/ ThisOldHouseIG
Tumblr: bit.ly/ ThisOldHouseTumblr
www.instagram.com/ asktoh/
The Correct Way to Build a Fire in a Fireplace
www.youtube.com/ user/ thisoldhouse/
This Old House, Ask This Old House, DIY, Home Improvement, DIY Ideas, Renovation, Renovation Ideas, How To Fix, How To Install, How To Build, mark mccullough, fireplace, fire safety, masonry
Full episode:
Deck Staining, Water Monitoring | Ask TOH
www.thisoldhouse.com/ watch/ deck-staining-water-monitoring-ask-toh
Tags:
|
Length: |
min.
|
|
Category: |
|
|
Rating: | 0.00
|
|
|
|
Click to Play Video
|
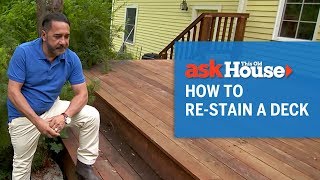
How to Re-Stain a Deck | Ask This Old House
Jun 23, 2019
Ask This Old House painter Mauro Henrique teaches a homeowner how to re-stain her mahogany deck
#ThisOldHouse #AskTOH
SUBSCRIBE to This Old House: bit.ly/ SubscribeThisOldHouse
Time: 4-6 hours
Cost: $200
Skill Level: Moderate
Tools List for Re-Staining a Deck:
Palm sander [amzn.to/ 31IWi34]
Floor sander [amzn.to/ 31FP4MV]
Paintbrush [amzn.to/ 2KWlvAU]
Buckets [amzn.to/ 31FTJP9]
Shopping List:
40/ 60/ 80 grit sandpaper [amzn.to/ 2IoLEqc]
Penetrating wood oil [amzn.to/ 2XgJTUw]
Lamb’s wool applicator [amzn.to/ 2KYDUNB]
Paint tray [amzn.to/ 2KosO4Z]
Steps:
1. Clean all debris off the deck with a leaf blower.
2. Start by sanding the edges of the deck with 40 grit sandpaper.
3. Switch to the floor sander to sand the rest of the deck, again using the 40 grit sandpaper.
4. Repeat this process with the 60 and 80 grit sandpaper.
5. Pour the penetrating oil into a bucket. Apply the oil around the edges of the deck using a paintbrush.
6. Pour some of the penetrating oil into the paint tray. Using the lamb’s wool applicator, apply the stain to the rest of the deck using long strokes. Apply a generous coat but make sure it gets spread well.
7. Allow the first coat to dry and then apply a second coat after 24 hours.
8. The following year after applying a new stain, clean off the deck and apply another coat of the stain to the deck.
9. Reapply the stain to the deck every two years to maintain its finish.
Resources:
To properly re-stain a deck, Mauro explains that the surface needs to be completely sanded down before accepting new stain. To make the job easier, Mauro suggests renting a floor sander from a home center for the day. They will provide you with the correct sandpaper and a set of instructions to ensure you have everything you need to properly sand down the deck.
For the stain, Mauro applied a transparent penetrating wood oil in a natural finish manufactured by PPG [amzn.to/ 2XgJTUw]. This stain can be found at most home centers.
The other tools Mauro used to apply the stain, including the paintbrushes, extension pole and the lambs wool applicator pad, can also be found at home centers.
Expert assistance with this segment was provided by Mauro’s Painting (www.maurospainting.com).
About This Old House TV:
This Old House is the No. 1 multimedia home enthusiast brand, offering trusted information and expert advice through award-winning television, a highly regarded magazine, and an information-driven website. This Old House and Ask This Old House are produced by This Old House Ventures, LLC and are presented on PBS by WGBH Boston.
Follow This Old House and Ask This Old House:
Facebook: bit.ly/ ThisOldHouseFB
Twitter: bit.ly/ ThisOldHouseTwitter
bit.ly/ AskTOHTwitter
Pinterest: bit.ly/ ThisOldHousePinterest
Instagram: bit.ly/ ThisOldHouseIG
Tumblr: bit.ly/ ThisOldHouseTumblr
www.instagram.com/ asktoh/
How to Re-Stain a Deck
www.youtube.com/ user/ thisoldhouse/
This Old House, Ask This Old House, DIY, Home Improvement, DIY Ideas, Renovation, Renovation Ideas, How To Fix, How To Install, How To Build, mauro henrique, painting, decks, stains and finishes, maintenance
Full episode:
Deck Staining, Water Monitoring | Ask TOH
www.thisoldhouse.com/ watch/ deck-staining-water-monitoring-ask-toh
Tags:
|
Length: |
min.
|
|
Category: |
|
|
Rating: | 0.00
|
|
|
|
Click to Play Video

|
How to Sharpen a Pocket Knife | Ask This Old House
Jun 24, 2019
Ask This Old House general contractor Tom Silva demonstrates how to sharpen a knife
#ThisOldHouse #AskTOH
SUBSCRIBE to This Old House: bit.ly/ SubscribeThisOldHouse
Time: 5 minutes
Cost: $10
Skill Level: Beginner
Tools List for Knife Sharpening:
Pocket knife [amzn.to/ 2FgSqfK]
Sharpening stone [amzn.to/ 2XkGxzW]
Shopping List:
Oil (depending on the stone) [amzn.to/ 2MRDqv8]
Steps:
1. Apply a small amount of water or oil to the sharpening stone. The packaging the stone came in should indicate whether it requires water or oil.
2. Drag the knife across the stone in a diagonal direction. Repeat this 3 or 4 times on the stone and keep an eye on the angle the knife is being held at so that it stays consistent.
3. Flip the knife over and repeat the process on the other side of the blade.
Resources:
Tom explained that knives need to be sharpened on a sharpening stone. These stones can be naturally quarried or they can be manufactured. They all require some form of lubrication, which can be water or oil, depending on the stone.
The sharpening stones Tom demonstrated in the segment can all be found at home centers or woodworking supply stores.
About This Old House TV:
This Old House is the No. 1 multimedia home enthusiast brand, offering trusted information and expert advice through award-winning television, a highly regarded magazine, and an information-driven website. This Old House and Ask This Old House are produced by This Old House Ventures, LLC and are presented on PBS by WGBH Boston.
Follow This Old House and Ask This Old House:
Facebook: bit.ly/ ThisOldHouseFB
Twitter: bit.ly/ ThisOldHouseTwitter
bit.ly/ AskTOHTwitter
Pinterest: bit.ly/ ThisOldHousePinterest
Instagram: bit.ly/ ThisOldHouseIG
Tumblr: bit.ly/ ThisOldHouseTumblr
www.instagram.com/ asktoh/
How to Sharpen a Pocket Knife
www.youtube.com/ user/ thisoldhouse/
This Old House, Ask This Old House, DIY, Home Improvement, DIY Ideas, Renovation, Renovation Ideas, How To Fix, How To Install, How To Build, tom silva, kevin o'connor, tools, maintenance, pocket knife, sharpen
Full episode:
Deck Staining, Water Monitoring | Ask TOH
www.thisoldhouse.com/ watch/ deck-staining-water-monitoring-ask-toh
Tags:
|
Length: |
min.
|
|
Category: |
|
|
Rating: | 0.00
|
|
|
|
Click to Play Video

|
How to Apply Rafter Tails | Pro2Pro | This Old House
Jun 11, 2019
How do you apply rafter tails to the exterior of a structure after the walls have been sheathed? Home builder Jeff Sweenor developed a simple solution that's efficient to execute.
#ThisOldHouse #AskTOH #Pro2Pro
SUBSCRIBE to This Old House: bit.ly/ SubscribeThisOldHouse
During a recent trip to our Westerly project, Kevin O’Connor caught up with builder Jeff Sweenor to discuss the rafter tail detail and how Sweenor ultimately decided to approach the build. The drawings for this Dutch Colonial call for a series of applied tails on several areas of the exterior, including along the sidewalls where the gambrel roof sits. This section of the house called for 62 rafter tails, which are spec’d to be installed along the exterior to create an eave detail.
The drawings specify a continuous 2x6 cleat to hold 62 rafter tails that are 14” wide and include a soft slope. Note in the drawing (at min. 1:02) that the tails were milled so that when installed onto the 2x6 cleat, the bottom edge of the cleat aligns with the bottom of the rafter tails. This provides continuous nailing surface at the back of the soffit. Also worth noting is the beveled 2x6 ledger at the top which provides continuous nailing for the double layers of 3/ 8” plywood. Finally, a beveled 2x sub fascia provides nailing for the fascia and ties the front of the rafter tails together.
Sweenor says that to have these built on-site would have taken one of his carpenters two full days using a jigsaw and circular saw because so many needed to be made (approximately 150 tails total, including some for other parts of the house not shown here). Given the consistent results a CNC-milled product offers, and the labor savings (two days spent moving the job forward in other ways), for Sweenor this method outweighs site-built options for quality and cost. Check out the video to learn more.
Pro2Pro:
A network of pro content creators compare field notes in every category of the trades, from carpentry and framing to landscaping and plumbing, and everything in between.
About This Old House TV:
This Old House is the No. 1 multimedia home enthusiast brand, offering trusted information and expert advice through award-winning television, a highly regarded magazine, and an information-driven website. This Old House and Ask This Old House are produced by This Old House Ventures, LLC and are presented on PBS by WGBH Boston.
Follow This Old House and Ask This Old House:
Facebook: bit.ly/ ThisOldHouseFB
Twitter: bit.ly/ ThisOldHouseTwitter
bit.ly/ AskTOHTwitter
Pinterest: bit.ly/ ThisOldHousePinterest
Instagram: bit.ly/ ThisOldHouseIG
Tumblr: bit.ly/ ThisOldHouseTumblr
How to Apply Rafter Tails | Pro2Pro | This Old House
www.youtube.com/ user/ thisoldhouse/
Tags:
|
Length: |
min.
|
|
Category: |
|
|
Rating: | 0.00
|
|
|
|
Click to Play Video

|
Build Removable Wood-Framed Screens | Pro2Pro | This Old House
Jun 12, 2019
Tom Silva and Jeff Sweenor illustrate how to make removable screens for a screened porch.
#ThisOldHouse #AskTOH #Pro2Pro
SUBSCRIBE to This Old House: bit.ly/ SubscribeThisOldHouse
The net-zero house designed by homeowner and architect Don Powers called for a screened-in porch. Jeff framed the porch with 2x4s, and added a detail that allows for a removable frame. In the end, the screens integrate seamlessly into the overall design of the porch – but they can be repaired easily as needed.
Pro2Pro:
A network of pro content creators compare field notes in every category of the trades, from carpentry and framing to landscaping and plumbing, and everything in between.
About This Old House TV:
This Old House is the No. 1 multimedia home enthusiast brand, offering trusted information and expert advice through award-winning television, a highly regarded magazine, and an information-driven website. This Old House and Ask This Old House are produced by This Old House Ventures, LLC and are presented on PBS by WGBH Boston.
Follow This Old House and Ask This Old House:
Facebook: bit.ly/ ThisOldHouseFB
Twitter: bit.ly/ ThisOldHouseTwitter
bit.ly/ AskTOHTwitter
Pinterest: bit.ly/ ThisOldHousePinterest
Instagram: bit.ly/ ThisOldHouseIG
Tumblr: bit.ly/ ThisOldHouseTumblr
Build Removable Wood-Framed Screens | Pro2Pro | This Old House
www.youtube.com/ user/ thisoldhouse/
Tags:
|
Length: |
min.
|
|
Category: |
|
|
Rating: | 0.00
|
|
|
|
Click to Play Video

|
A Safe Septic System for Nearby Waterways | Pro2Pro | This Old House
Jun 13, 2019
Plumbing and heating expert Richard Trethewey walks us through a system that was designed for a home built near a pond and the ocean.
#ThisOldHouse #AskTOH #Pro2Pro
SUBSCRIBE to This Old House: bit.ly/ SubscribeThisOldHouse
Due to its proximity to a pond and the ocean, our Westerly Ranch House [www.thisoldhouse.com/ watch/ westerly-ranch-house] project required a septic system equipped with advanced secondary treatment. The purpose of the treatment is to reduce the ammonia and nitrogen that typically leaches into the ground downstream from the tank. Combined with a traditional septic tank, this system converts nitrogen to gas which is vented through the roof of the house. Our plumbing and heating expert Richard Trethewey explains more here.
Pro2Pro:
A network of pro content creators compare field notes in every category of the trades, from carpentry and framing to landscaping and plumbing, and everything in between.
About This Old House TV:
This Old House is the No. 1 multimedia home enthusiast brand, offering trusted information and expert advice through award-winning television, a highly regarded magazine, and an information-driven website. This Old House and Ask This Old House are produced by This Old House Ventures, LLC and are presented on PBS by WGBH Boston.
Follow This Old House and Ask This Old House:
Facebook: bit.ly/ ThisOldHouseFB
Twitter: bit.ly/ ThisOldHouseTwitter
bit.ly/ AskTOHTwitter
Pinterest: bit.ly/ ThisOldHousePinterest
Instagram: bit.ly/ ThisOldHouseIG
Tumblr: bit.ly/ ThisOldHouseTumblr
A Safe Septic System for Nearby Waterways | Pro2Pro | This Old House
www.youtube.com/ user/ thisoldhouse/
Tags:
|
Length: |
min.
|
|
Category: |
|
|
Rating: | 0.00
|
|
|
|
Click to Play Video
|
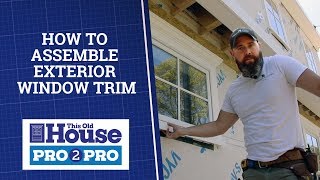
How to Assemble Exterior Window Trim | Pro2Pro | This Old House
Jun 14, 2019
Sweenor Builders developed a process for trimming out windows that yields tight joints sure to withstand harsh climates.
#ThisOldHouse #AskTOH #Pro2Pro
SUBSCRIBE to This Old House: bit.ly/ SubscribeThisOldHouse
On a recent trip to our Westerly Ranch House [www.thisoldhouse.com/ watch/ westerly-ranch-house] project I caught up with Adam Spink, a lead carpenter for Sweenor Builders [sweenorbuilders.com]. Adam has developed an efficient process for trimming out windows that produces a flawless look exemplary of the quality craftsmanship Sweenor Builders is noted for. In this video, he builds a sample to illustrate his process. He and his team use a pre-treated pine product that resists rot. Combined with exterior-grade glue, fasteners, primer and paint, the trim is sure to withstand Westerly’s climate while maintaining its aesthetic for decades to come.
Pro2Pro:
A network of pro content creators compare field notes in every category of the trades, from carpentry and framing to landscaping and plumbing, and everything in between.
About This Old House TV:
This Old House is the No. 1 multimedia home enthusiast brand, offering trusted information and expert advice through award-winning television, a highly regarded magazine, and an information-driven website. This Old House and Ask This Old House are produced by This Old House Ventures, LLC and are presented on PBS by WGBH Boston.
Follow This Old House and Ask This Old House:
Facebook: bit.ly/ ThisOldHouseFB
Twitter: bit.ly/ ThisOldHouseTwitter
bit.ly/ AskTOHTwitter
Pinterest: bit.ly/ ThisOldHousePinterest
Instagram: bit.ly/ ThisOldHouseIG
Tumblr: bit.ly/ ThisOldHouseTumblr
How to Assemble Exterior Window Trim | Pro2Pro | This Old House
www.youtube.com/ user/ thisoldhouse/
Tags:
|
Length: |
min.
|
|
Category: |
|
|
Rating: | 0.00
|
|
|
|
Click to Play Video

|
What Do Homeowners Need To Know About Insurance During Renovations? | Pro2Pro | This Old House
Jun 07, 2019
Kevin O'Connor, Charlie Silva and State Farm's Caleb Carney tell homeowners what they need to know about their own insurance during a renovation.
#ThisOldHouse #AskTOH
SUBSCRIBE to This Old House: bit.ly/ SubscribeThisOldHouse
About Pro2Pro:
A network of pro content creators compare field notes in every category of the trades, from carpentry and framing to landscaping and plumbing, and everything in between.
About This Old House TV:
This Old House is the No. 1 multimedia home enthusiast brand, offering trusted information and expert advice through award-winning television, a highly regarded magazine, and an information-driven website. This Old House and Ask This Old House are produced by This Old House Ventures, LLC and are presented on PBS by WGBH Boston.
Follow This Old House and Ask This Old House:
Facebook: bit.ly/ ThisOldHouseFB
Twitter: bit.ly/ ThisOldHouseTwitter
bit.ly/ AskTOHTwitter
Pinterest: bit.ly/ ThisOldHousePinterest
Instagram: bit.ly/ ThisOldHouseIG
Tumblr: bit.ly/ ThisOldHouseTumblr
What Do Homeowners Need To Know About Insurance During Renovations | Pro2Pro | This Old House
www.youtube.com/ user/ thisoldhouse/
Tags:
|
Length: |
min.
|
|
Category: |
|
|
Rating: | 0.00
|
|
|
|
Click to Play Video

|
What Should Homeowners Ask Contractors About Insurance? | Pro2Pro | This Old House
Jun 07, 2019
Kevin O'Connor, Charlie Silva and State Farm's Caleb Carney discuss what homeowners must ask their contractors for in terms of insurance.
#ThisOldHouse #AskTOH
SUBSCRIBE to This Old House: bit.ly/ SubscribeThisOldHouse
About Pro2Pro:
A network of pro content creators compare field notes in every category of the trades, from carpentry and framing to landscaping and plumbing, and everything in between.
About This Old House TV:
This Old House is the No. 1 multimedia home enthusiast brand, offering trusted information and expert advice through award-winning television, a highly regarded magazine, and an information-driven website. This Old House and Ask This Old House are produced by This Old House Ventures, LLC and are presented on PBS by WGBH Boston.
Follow This Old House and Ask This Old House:
Facebook: bit.ly/ ThisOldHouseFB
Twitter: bit.ly/ ThisOldHouseTwitter
bit.ly/ AskTOHTwitter
Pinterest: bit.ly/ ThisOldHousePinterest
Instagram: bit.ly/ ThisOldHouseIG
Tumblr: bit.ly/ ThisOldHouseTumblr
What Should Homeowners Ask Contractors About Insurance? | Pro2Pro | This Old House
www.youtube.com/ user/ thisoldhouse/
Tags:
|
Length: |
min.
|
|
Category: |
|
|
Rating: | 0.00
|
|
|
|
Click to Play Video

|
Are Your Tools And Materials Covered On A Jobsite? | Pro2Pro | This Old House
Jun 07, 2019
Kevin O'Connor, Charlie Silva and State Farm's Caleb Carney tell you if your tools are covered while on a jobsite.
#ThisOldHouse #AskTOH
SUBSCRIBE to This Old House: bit.ly/ SubscribeThisOldHouse
About Pro2Pro:
A network of pro content creators compare field notes in every category of the trades, from carpentry and framing to landscaping and plumbing, and everything in between.
About This Old House TV:
This Old House is the No. 1 multimedia home enthusiast brand, offering trusted information and expert advice through award-winning television, a highly regarded magazine, and an information-driven website. This Old House and Ask This Old House are produced by This Old House Ventures, LLC and are presented on PBS by WGBH Boston.
Follow This Old House and Ask This Old House:
Facebook: bit.ly/ ThisOldHouseFB
Twitter: bit.ly/ ThisOldHouseTwitter
bit.ly/ AskTOHTwitter
Pinterest: bit.ly/ ThisOldHousePinterest
Instagram: bit.ly/ ThisOldHouseIG
Tumblr: bit.ly/ ThisOldHouseTumblr
Are Your Tools And Materials Covered On A Jobsite? | Pro2Pro | This Old House
www.youtube.com/ user/ thisoldhouse/
Tags:
|
Length: |
min.
|
|
Category: |
|
|
Rating: | 0.00
|
|
|
|
Click to Play Video

|
Which Insurance Policies Must A General Contractor Have? | Pro2Pro | This Old House
Jun 06, 2019
Kevin O'Connor asks Charlie Silva and State Farm's Caleb Carney which insurance policies a general contractor needs.
#ThisOldHouse #AskTOH
SUBSCRIBE to This Old House: bit.ly/ SubscribeThisOldHouse
About Pro2Pro:
A network of pro content creators compare field notes in every category of the trades, from carpentry and framing to landscaping and plumbing, and everything in between.
About This Old House TV:
This Old House is the No. 1 multimedia home enthusiast brand, offering trusted information and expert advice through award-winning television, a highly regarded magazine, and an information-driven website. This Old House and Ask This Old House are produced by This Old House Ventures, LLC and are presented on PBS by WGBH Boston.
Follow This Old House and Ask This Old House:
Facebook: bit.ly/ ThisOldHouseFB
Twitter: bit.ly/ ThisOldHouseTwitter
bit.ly/ AskTOHTwitter
Pinterest: bit.ly/ ThisOldHousePinterest
Instagram: bit.ly/ ThisOldHouseIG
Tumblr: bit.ly/ ThisOldHouseTumblr
Which Insurance Policies Must A General Contractor Have? | Pro2Pro | This Old House
www.youtube.com/ user/ thisoldhouse/
Tags:
|
Length: |
min.
|
|
Category: |
|
|
Rating: | 0.00
|
|
|
|
Click to Play Video

|
Do Landscape Contractors Need Separate Summer And Winter Insurance? | Pro2Pro | This Old House
Jun 10, 2019
Kevin O'Connor asks Charlie Silva and State Farm's Caleb Carney if landscapers need different insurance in the winter if they are plowing.
#ThisOldHouse #AskTOH
SUBSCRIBE to This Old House: bit.ly/ SubscribeThisOldHouse
About Pro2Pro:
A network of pro content creators compare field notes in every category of the trades, from carpentry and framing to landscaping and plumbing, and everything in between.
About This Old House TV:
This Old House is the No. 1 multimedia home enthusiast brand, offering trusted information and expert advice through award-winning television, a highly regarded magazine, and an information-driven website. This Old House and Ask This Old House are produced by This Old House Ventures, LLC and are presented on PBS by WGBH Boston.
Follow This Old House and Ask This Old House:
Facebook: bit.ly/ ThisOldHouseFB
Twitter: bit.ly/ ThisOldHouseTwitter
bit.ly/ AskTOHTwitter
Pinterest: bit.ly/ ThisOldHousePinterest
Instagram: bit.ly/ ThisOldHouseIG
Tumblr: bit.ly/ ThisOldHouseTumblr
Do Landscape Contractors Need Separate Summer And Winter Insurance? | Pro2Pro | This Old House
www.youtube.com/ user/ thisoldhouse/
Tags:
|
Length: |
min.
|
|
Category: |
|
|
Rating: | 0.00
|
|
|
|
Click to Play Video

|
What's The Difference Between Bonded And Insured? | Pro2Pro | This Old House
Jun 08, 2019
Kevin O'Connor asks Charlie Silva and State Farm's Caleb Carney about the difference between being bonded and being insured.
#ThisOldHouse #AskTOH
SUBSCRIBE to This Old House: bit.ly/ SubscribeThisOldHouse
About Pro2Pro:
A network of pro content creators compare field notes in every category of the trades, from carpentry and framing to landscaping and plumbing, and everything in between.
About This Old House TV:
This Old House is the No. 1 multimedia home enthusiast brand, offering trusted information and expert advice through award-winning television, a highly regarded magazine, and an information-driven website. This Old House and Ask This Old House are produced by This Old House Ventures, LLC and are presented on PBS by WGBH Boston.
Follow This Old House and Ask This Old House:
Facebook: bit.ly/ ThisOldHouseFB
Twitter: bit.ly/ ThisOldHouseTwitter
bit.ly/ AskTOHTwitter
Pinterest: bit.ly/ ThisOldHousePinterest
Instagram: bit.ly/ ThisOldHouseIG
Tumblr: bit.ly/ ThisOldHouseTumblr
What's The Difference Between Bonded And Insured? | Pro2Pro | This Old House
www.youtube.com/ user/ thisoldhouse/
Tags:
|
Length: |
min.
|
|
Category: |
|
|
Rating: | 0.00
|
|
|
|
Click to Play Video

|
Do Insurance Laws And Coverage Vary State By State? | Pro2Pro | This Old House
Jun 09, 2019
Kevin O'Connor asks Charlie Silva and State Farm's Caleb Carney about insurance laws in different states.
#ThisOldHouse #AskTOH
SUBSCRIBE to This Old House: bit.ly/ SubscribeThisOldHouse
About Pro2Pro:
A network of pro content creators compare field notes in every category of the trades, from carpentry and framing to landscaping and plumbing, and everything in between.
About This Old House TV:
This Old House is the No. 1 multimedia home enthusiast brand, offering trusted information and expert advice through award-winning television, a highly regarded magazine, and an information-driven website. This Old House and Ask This Old House are produced by This Old House Ventures, LLC and are presented on PBS by WGBH Boston.
Follow This Old House and Ask This Old House:
Facebook: bit.ly/ ThisOldHouseFB
Twitter: bit.ly/ ThisOldHouseTwitter
bit.ly/ AskTOHTwitter
Pinterest: bit.ly/ ThisOldHousePinterest
Instagram: bit.ly/ ThisOldHouseIG
Tumblr: bit.ly/ ThisOldHouseTumblr
Do Insurance Laws And Coverage Vary State By State? | Pro2Pro | This Old House
www.youtube.com/ user/ thisoldhouse/
Tags:
|
Length: |
min.
|
|
Category: |
|
|
Rating: | 0.00
|
|
|
|
Click to Play Video

|
What Does a Contractor Need to Tell Their Insurance Agent? | Pro2Pro | This Old House
Jun 08, 2019
Kevin O'Connor asks Charlie Silva and State Farm's Caleb Carney about how a contractor needs to arrange for Insurance.
#ThisOldHouse #AskTOH
SUBSCRIBE to This Old House: bit.ly/ SubscribeThisOldHouse
About Pro2Pro:
A network of pro content creators compare field notes in every category of the trades, from carpentry and framing to landscaping and plumbing, and everything in between.
About This Old House TV:
This Old House is the No. 1 multimedia home enthusiast brand, offering trusted information and expert advice through award-winning television, a highly regarded magazine, and an information-driven website. This Old House and Ask This Old House are produced by This Old House Ventures, LLC and are presented on PBS by WGBH Boston.
Follow This Old House and Ask This Old House:
Facebook: bit.ly/ ThisOldHouseFB
Twitter: bit.ly/ ThisOldHouseTwitter
bit.ly/ AskTOHTwitter
Pinterest: bit.ly/ ThisOldHousePinterest
Instagram: bit.ly/ ThisOldHouseIG
Tumblr: bit.ly/ ThisOldHouseTumblr
What Does a Contractor Need to Tell Their Insurance Agent? | Pro2Pro | This Old House
www.youtube.com/ user/ thisoldhouse/
Tags:
|
Length: |
min.
|
|
Category: |
|
|
Rating: | 0.00
|
|
|
|
Click to Play Video

|
Marine Craftsmanship
May 24, 2019
In this episode of Tool School, Festool trainer Brian Sedgeley joins world-renowned sailor and photographer Onne van der Wal to create a navigation panel for his 1972 Pearson 36 sailboat, using a variety of Festool tools.
Tags:
|
Length: |
min.
|
|
Category: |
|
|
Rating: | 0.00
|
|
|
|
Click to Play Video

|
Pro2Pro Livestream: Focus on Insurance
May 23, 2019
Join us live on Thursday, May 23rd at 4pm EST for a discussion about contractors insurance. During this 30 minute event, Host Kevin O’Connor will talk with home builder Charlie Silva of Silva Brothers Construction and State Farm® Agent Caleb Carney about asset protection and liability insurance as each relates to contractors. The three will cover questions like when does a contractor need asset protection and where are contractors vulnerable with respect to professional liability, and more. There will be a Q&A session as well.
This livestream will run for approximately 30 minutes starting at 4pm EST.
Tags:
|
Length: |
min.
|
|
Category: |
|
|
Rating: | 0.00
|
|
|
|
Click to Play Video

|
How to Use a Paint Sprayer
May 31, 2019
Ask This Old House painter Mauro Henrique gives a tutorial on how to set up and work with a paint sprayer
Click here to SUBSCRIBE to the official This Old House YouTube channel: www.youtube.com/ subscription_center?add_user=thisoldhouse
Cost: $500
Skill Level: Moderate
Tools List for Using a Paint Sprayer:
Paint Sprayer [amzn.to/ 2HPLXco]
Bucket [amzn.to/ 2W0hpi0]
Shopping List:
Drop cloths [amzn.to/ 2X2gwSv]
Painter’s tape [amzn.to/ 2VZj33w]
Steps:
1. Using a paint sprayer can help give a smooth finish in a short amount of time, but it can be messier than a regular paint job. Start by covering the entire work area with plastic drop cloths and painter’s tape.
2. Before spraying with paint, prime the sprayer.
a. Turn the valve to “prime” on the side of the sprayer.
b. Set the painting tube into the can of paint.
c. Set the clear priming tube into the empty bucket.
d. Turn the sprayer on and wait until there are no more bubbles coming out in the bucket.
3. Set the spray hose and turn the valve to “paint” on the side of the sprayer.
4. Spray the paint into the priming bucket until there is no more water or bubbles coming out.
5. Attach the spray guard on top of the nozzle and begin painting.
6. While spraying, keep the gun parallel and the same distance away from the surface that’s being painted.
7. Apply the paint in long, broad strokes for an even finish. Overlap each stroke by about 50%.
8. After the paint job is finished, replace the paint can with a clean bucket of water and reverse the priming process to clean out the sprayer and the tube.
Resources:
To demonstrate paint spraying techniques, Mauro used a Titan Impact 640 Skid Airless Paint Sprayer (amzn.to/ 2HzK58J).
Expert assistance with this segment was provided by Mauro’s Painting (www.maurospainting.com/ ).
Ask This Old House TV
Homeowners have a virtual truckload of questions for us on smaller projects, and we're ready to answer. Ask This Old House solves the steady stream of home improvement problems faced by our viewers—and we make house calls! Ask This Old House features some familiar faces from This Old House, including Kevin O'Connor, general contractor Tom Silva, plumbing and heating expert Richard Trethewey, and landscape contractor Roger Cook.
This Old House releases new segments every Sunday, Monday, Wednesday and Friday.
Keywords: This Old House, How-to, home improvement, DIY, ask this old house, mauro henrique, kevin o'connor, paint sprayer, painting, interior
Watch the full episode: www.thisoldhouse.com/ watch/ humidity-mystery-brick-patch-ask-toh
Follow This Old House and Ask This Old House:
Facebook: www.facebook.com/ ThisOldHouse
Twitter: twitter.com/ thisoldhouse
twitter.com/ asktoh
Pinterest: www.pinterest.com/ thisoldhouse/
Instagram: instagram.com/ thisoldhouse
Tumblr: thisoldhouse.tumblr.com/
Tags:
|
Length: |
min.
|
|
Category: |
|
|
Rating: | 0.00
|
|
|
|
Click to Play Video

|
How to Patch a Hole in a Brick Wall
May 29, 2019
Ask This Old House mason Mark McCullough travels to Denver to patch a hole in a brick wall
Click here to SUBSCRIBE to the official This Old House YouTube channel: www.youtube.com/ subscription_center?add_user=thisoldhouse
Time: 4-6 hours
Cost: $150
Skill Level: Moderate to Difficult
Tools List for Patching a Brick Wall:
Safety glasses [amzn.to/ 2QhziTi]
Angle grinder [amzn.to/ 2HAh0dn]
HEPA vacuum [amzn.to/ 2ErI5NS]
Hammer [amzn.to/ 30EKJcE]
Masonry brush [amzn.to/ 2VKE4tq]
Bucket [amzn.to/ 2W0hpi0]
Trowel [amzn.to/ 2VVYrsG]
Tuck pointer [amzn.to/ 2QlUXtr]
Concave jointer [amzn.to/ 2VNbOXo]
Shopping List:
Replacement bricks
Dust mask [amzn.to/ 2X4C5BM]
Type N mortar [amzn.to/ 2Et2IJj]
Steps:
1. Start by identifying any bricks that have been cut for the hole. Any bricks that are no longer full sized should be removed.
2. To remove the smaller bricks, cut along the mortar lines closest to the brick that’s being removed using an angle grinder. To keep the dust down, use a grinder with a vacuum attachment and connect it to a HEPA vacuum. These tools can be rented from the home center if you don’t have them.
3. Once the mortar lines have been cut, carefully hit the bricks out of place with a hammer. Watch the mortar lines near bricks that aren’t being cut out. If there’s resistance, it’s possible those bricks will end up damaged and will need to get cut out as well.
4. Once the bricks and the mortar have been removed, wipe away any excess dust with a masonry brush.
5. Wet the masonry brush and do a second pass on the wall.
6. Now it’s time to put the bricks into place. Start by mixing up the mortar in the bucket with water until it’s at roughly an oatmeal consistency.
7. Scoop some of the mortar onto the trowel and then lay it onto the brick wall.
8. Add some mortar to one side of the replacement brick. Then, place it on top of the bed joint just laid in the previous step. Wiggle it into place and gently tap it using the back side of the trowel until it lines up with the other bricks in its row.
9. Continue this process with the rest of the replacement bricks until the hole is filled.
10. Use the tuck pointer to fill in all the joints as deep as possible.
11. Slick down all the new joints using the concave jointer.
12. Wipe off any excess mortar on the face of the bricks using the masonry brush.
13. Once all the excess mortar is off, do a final slick with the concave jointer.
Resources:
For such a small repair, it may be a challenge to get a mason to fix the brick wall, so Mark suggests renting a few tools and tackling a project of this size on your own.
To find matching brick, take a picture, identify a nearby brick yard, and show someone there the picture. It’s likely they will recognize the brick and be able to give you a few that you need for little money. In this case, Mark went to Summit Brick Company (www.summitbrick.com/ ) and they were able to find what he needed.
Depending on the hole in the wall, it’s likely that surrounding bricks or mortar may need to be carefully removed. An angle grinder with a vacuum attachment can be rented from most home centers and should help keep the dust down. Mark used a 5” angle grinder [amzn.to/ 2VKfFnW] with tuck pointing guard and a 9 gallon dust extractor [amzn.to/ 2X9Pysl] with automatic cleaning, both manufactured by Bosch Tools.
For mortar, Mark used a Type N premixed mortar bag [amzn.to/ 2JDjhXp], which is manufactured by Quikrete.
All the other tools required for this project, including the trowel, masonry brush, and jointers, can all be found at home centers.
Expert assistance with this segment was provided by MJM Masonry (mjmmasonry.com/ ).
Ask This Old House TV
Homeowners have a virtual truckload of questions for us on smaller projects, and we're ready to answer. Ask This Old House solves the steady stream of home improvement problems faced by our viewers—and we make house calls! Ask This Old House features some familiar faces from This Old House, including Kevin O'Connor, general contractor Tom Silva, plumbing and heating expert Richard Trethewey, and landscape contractor Roger Cook.
This Old House releases new segments every Sunday, Monday, Wednesday and Friday.
Keywords: This Old House, How-to, home improvement, DIY, ask this old house, mark mccullough, brick, wall, exterior, repair, masonry
Watch the full episode: www.thisoldhouse.com/ watch/ humidity-mystery-brick-patch-ask-toh
Follow This Old House and Ask This Old House:
Facebook: www.facebook.com/ ThisOldHouse
Twitter: twitter.com/ thisoldhouse
twitter.com/ asktoh
Pinterest: www.pinterest.com/ thisoldhouse/
Instagram: instagram.com/ thisoldhouse
Tumblr: thisoldhouse.tumblr.com/
Tags:
|
Length: |
min.
|
|
Category: |
|
|
Rating: | 0.00
|
|
|
|
Click to Play Video

|
How to Diagnose and Repair a Humid Air Conditioner
May 27, 2019
Ask This Old House plumbing and heating expert Richard Trethewey travels to Orlando to diagnose and repair an HVAC system that is creating way too much humidity
Click here to SUBSCRIBE to the official This Old House YouTube channel: www.youtube.com/ subscription_center?add_user=thisoldhouse
Time: 3-4 hours
Skill Level: Expert
Steps:
1. When diagnosing a humid air conditioning system, Richard usually follows a series of steps based on the most common issue and works his way to more specific issues.
2. First, Richard checks the sizing of the equipment. Square footage alone isn’t enough to determine the appropriate size of a unit, since insulation, building materials, window openings, etc., can all also impact how much work a unit will need to do. He’s often found that units are oversized with the thought that “bigger is better”, but when that happens, the unit won’t stay on long enough to eliminate humidity. If the unit is the wrong size, it will need to be replaced.
3. The next thing Richard normally checks is thermostat setbacks. If the setback temperatures are too far apart during the day, the air conditioning system will have to work too hard to eliminate heat and humidity in the building, which would explain why the house feels humid. Keep setback temperatures to around 5 degrees difference to prevent the system from overworking.
4. If neither of these issues is causing the problem, it’s time to start digging into the specifics of the system. In this case, Richard found that a UV light was requiring a fan to be on all day. That fan was pushing the moisture collecting on the cold coil of the AC unit back into the building, causing the humidity.
5. To solve this issue, Richard removed the UV light and adjusted the fan so that it only turns on while the unit is in cooling mode.
Resources:
Richard installed the Healthy Climate Solutions MERV 16 air filter [amzn.to/ 2wfqX9k], manufactured by Lennox (www.lennox.com/ ).
Expert assistance with this project was provided by 4 Seasons Air Conditioning & Heating (www.4acnow.com/ ) and by Air Conditioning Contractors of Central Florida (www.accacf.com/ ).
Ask This Old House TV
Homeowners have a virtual truckload of questions for us on smaller projects, and we're ready to answer. Ask This Old House solves the steady stream of home improvement problems faced by our viewers—and we make house calls! Ask This Old House features some familiar faces from This Old House, including Kevin O'Connor, general contractor Tom Silva, plumbing and heating expert Richard Trethewey, and landscape contractor Roger Cook.
This Old House releases new segments every Sunday, Monday, Wednesday and Friday.
Keywords: This Old House, How-to, home improvement, DIY, ask this old house, richard trethewey, HVAC, air-conditioning, humidity, repair, plumbing
Watch the full episode: www.thisoldhouse.com/ watch/ humidity-mystery-brick-patch-ask-toh
Follow This Old House and Ask This Old House:
Facebook: www.facebook.com/ ThisOldHouse
Twitter: twitter.com/ thisoldhouse
twitter.com/ asktoh
Pinterest: www.pinterest.com/ thisoldhouse/
Instagram: instagram.com/ thisoldhouse
Tumblr: thisoldhouse.tumblr.com/
Tags:
|
Length: |
min.
|
|
Category: |
|
|
Rating: | 0.00
|
|
|
|
Click to Play Video

|
How to Manage Renovation Expectations
May 26, 2019
Ask This Old House general contractor Tom Silva discusses the conversations a homeowner and a contractor should have before starting a renovation project
Click here to SUBSCRIBE to the official This Old House YouTube channel: www.youtube.com/ subscription_center?add_user=thisoldhouse
Steps:
1. Tom and Kevin agree that a house renovation can be a very disruptive process for the everyday lives of homeowners. For that reason, Tom finds it helpful to discuss with homeowners up front all the ways they can expect their lives to be disrupted so they can prepare themselves for it.
a. Start time – most contractors prefer to start around 7am, which is often when homeowners are trying to get up and get ready for the day. If you’re not able to get up earlier, you’ll need to negotiate a different start time with the contractor, though starting later each day could delay the project.
b. Disturbing the neighbors – be mindful that, depending on the scope of the work, large, loud trucks that need to find parking and spaces to work are going to disrupt your neighbors as well. It makes the process go smoother and keeps everyone happier if you can give them a courtesy heads up before work begins to happen.
c. Bathroom use – even though it’s your home, it’s now a workplace for any contractor who comes to do work. Be prepared for the contractors to need to use your bathroom, and if muddy landscaping work is happening for an extended period of time, it might make sense to rent a port-o-potty.
2. Overall, Tom feels that having an open dialogue between homeowners and contractors before work begins will help head off any potential misunderstandings and problems before the project begins so that there are no issues that come up mid project that could slow the project down.
Ask This Old House TV
Homeowners have a virtual truckload of questions for us on smaller projects, and we're ready to answer. Ask This Old House solves the steady stream of home improvement problems faced by our viewers—and we make house calls! Ask This Old House features some familiar faces from This Old House, including Kevin O'Connor, general contractor Tom Silva, plumbing and heating expert Richard Trethewey, and landscape contractor Roger Cook.
This Old House releases new segments every Sunday, Monday, Wednesday and Friday.
Keywords: This Old House, How-to, home improvement, DIY, tom silva, ask this old house, renovation, general contractor, kevin o'connor
Watch the full episode: www.thisoldhouse.com/ watch/ humidity-mystery-brick-patch-ask-toh
Follow This Old House and Ask This Old House:
Facebook: www.facebook.com/ ThisOldHouse
Twitter: twitter.com/ thisoldhouse
twitter.com/ asktoh
Pinterest: www.pinterest.com/ thisoldhouse/
Instagram: instagram.com/ thisoldhouse
Tumblr: thisoldhouse.tumblr.com/
Tags:
|
Length: |
min.
|
|
Category: |
|
|
Rating: | 0.00
|
|
|
|
Click to Play Video

|
Pro2Pro Live: How to Properly Install a Window
May 24, 2019
During a recent shoot at our Westerly project, Tom Silva taught two of our apprentices how to properly install a window. First, he covered his method for prepping the rough opening. Then he showed them how to hang the window so that it is level, plumb, and square. Once the window was hung, he illustrated how to flash it properly to create a watertight seal. On Friday, May 24th at 11am EST, we’ll premiere this 30-minute video with Tom Silva and a Marvin installation technician answering your questions, live!
Tags:
|
Length: |
min.
|
|
Category: |
|
|
Rating: | 0.00
|
|
|
|
Click to Play Video

|
How to Plant Hardier Foundation Plantings
May 24, 2019
Ask This Old House landscape designer Jenn Nawada helps a homeowner replace and improve foundation plantings that have been crushed from snow piles.
Click here to SUBSCRIBE to the official This Old House YouTube channel: www.youtube.com/ subscription_center?add_user=thisoldhouse
Time: 3-4 hours
Cost: $200
Skill Level: Beginner
Tools List for Foundation Plantings:
Bypass pruners [amzn.to/ 2Webc1m]
Shovel [amzn.to/ 2w3KUzU]
Tarp [amzn.to/ 2w3QCSo]
Shopping List:
Grasses [amzn.to/ 2VKpmYz]
Perennials [amzn.to/ 2Q8XdnL]
Mulch [amzn.to/ 2LN0ESL]
Steps:
1. Start by identifying plants that have died or could use some pruning. Remove the dead plants and clean up the plants to make it easier to see what kind of palette you’re working with. Place the dead plants and cutoffs on the tarp to be easily dragged away later.
2. Choose and stage plants that will be able to tolerate snow piles in the winter. In this case, Jenn chose a dwarf fountain grass for its height and to anchor the rest of the foundation plantings. Underneath, she chose a variety of perennials with varying seasons, colors, and heights for visual impact. The grass can be cut back in the winter and shouldn’t be damaged in the snow, and the perennials will go dormant underground during the winter until next Spring.
3. Dig holes for the plants using the shovel that are twice as wide as their containers and almost as deep.
4. Pull the plants out of their containers and gently tease the roots.
5. Place the plants into the holes and backfill. Let the plants sit a little higher than the hole to allow for mulch.
6. Add a thin layer of mulch over all the plants.
7. Give all the plants a good watering and keep them watered as they get established.
Resources:
Jenn noticed that a lot of the foundation plantings the homeowner had around her walkway could easily be smothered by the snow when she shovels in the winter, which probably explains why they weren’t faring well. To alleviate this issue, Jenn picked plants that go dormant in the winter for the areas most vulnerable to snow piles.
Jenn planted a variety of plants, including dwarf fountain grass, lady’s mantle, stonecrop, coneflower (echinacea), Blue Hill Salvia, Rose Marvel Salvia, and windflower. These can all be found at nurseries and home centers.
The other tools and materials Jenn used to plant the foundation plantings, including the wheelbarrow [amzn.to/ 2HlIx1Y], shovels, and mulch, can all be found at home centers.
Expert assistance with this project was provided by Nawada Landscape Design (www.nawadalandscapedesign.com/ ).
Ask This Old House TV
Homeowners have a virtual truckload of questions for us on smaller projects, and we're ready to answer. Ask This Old House solves the steady stream of home improvement problems faced by our viewers—and we make house calls! Ask This Old House features some familiar faces from This Old House, including Kevin O'Connor, general contractor Tom Silva, plumbing and heating expert Richard Trethewey, and landscape contractor Roger Cook.
This Old House releases new segments every Sunday, Monday, Wednesday and Friday.
Keywords: This Old House, How-to, home improvement, DIY, ask this old house, jenn nawada, foundation plantings, plants, landscaping, hardiness
Watch the full episode: www.thisoldhouse.com/ watch/ scorched-floor-hardy-plantings-ask-toh
Follow This Old House and Ask This Old House:
Facebook: www.facebook.com/ ThisOldHouse
Twitter: twitter.com/ thisoldhouse
twitter.com/ asktoh
Pinterest: www.pinterest.com/ thisoldhouse/
G+: plus.google.com/ +thisoldhouse/ posts
Instagram: instagram.com/ thisoldhouse
Tumblr: thisoldhouse.tumblr.com/
Tags:
|
Length: |
min.
|
|
Category: |
|
|
Rating: | 0.00
|
|
|
|
Click to Play Video

|
Testing New Stud Finders
May 22, 2019
Ask This Old House home technology expert Ross Trethewey tests out a new, smart stud finder.
Click here to SUBSCRIBE to the official This Old House YouTube channel: www.youtube.com/ subscription_center?add_user=thisoldhouse
Cost: $80
Skill Level: Beginner
Shopping List:
Smart Stud Finder [amzn.to/ 2Q9eRYH]
Steps:
1. The stud finder Ross tested is smart phone compatible. The way it works, it sends radio frequencies through the wall. When the frequency comes in contact with things in the wall, the frequencies bounce back to the scanner. Based on how the frequencies bounce back, the scanner can determine what it is.
2. The stud finder works well with drywall, plaster, and concrete.
Resources:
Ross tested out the Walabot DIY Wall Scanner [amzn.to/ 2Q9eRYH], which can detect studs, pipes, and wires behind plaster, concrete, and drywall. It’s compatible only with Android phones.
Expert assistance with this segment was provided by TE2 Engineering (te2engineering.com/ ).
Ask This Old House TV
Homeowners have a virtual truckload of questions for us on smaller projects, and we're ready to answer. Ask This Old House solves the steady stream of home improvement problems faced by our viewers—and we make house calls! Ask This Old House features some familiar faces from This Old House, including Kevin O'Connor, general contractor Tom Silva, plumbing and heating expert Richard Trethewey, and landscape contractor Roger Cook.
This Old House releases new segments every Sunday, Monday, Wednesday and Friday.
Keywords: This Old House, How-to, home improvement, DIY, ask this old house, ross trethewey, tom silva, technology, smart device, app, stud finder
Watch the full episode: www.thisoldhouse.com/ watch/ scorched-floor-hardy-plantings-ask-toh
Follow This Old House and Ask This Old House:
Facebook: www.facebook.com/ ThisOldHouse
Twitter: twitter.com/ thisoldhouse
twitter.com/ asktoh
Pinterest: www.pinterest.com/ thisoldhouse/
Instagram: instagram.com/ thisoldhouse
Tumblr: thisoldhouse.tumblr.com/
Tags:
|
Length: |
min.
|
|
Category: |
|
|
Rating: | 0.00
|
|
|
|
Click to Play Video

|
How to Remove a Burn Mark from a Hardwood Floor
May 20, 2019
Ask This Old House carpenter Nathan Gilbert travels to Portland, Oregon to repair an original wood floor that was burned from a face down hot iron.
Click here to SUBSCRIBE to the official This Old House YouTube channel: www.youtube.com/ subscription_center?add_user=thisoldhouse
Time: 4-6 hours
Cost: $100
Skill Level: Moderate
Tools List for Removing a Burn Mark from a Wood Floor:
Random orbital sander [amzn.to/ 2EethC5]
Sanding block [amzn.to/ 2HogVJz]
Paint bucket [amzn.to/ 2VtuA5V]
Paintbrush [amzn.to/ 30onByF]
Shopping List:
150, 180, 220 grit sandpaper [amzn.to/ 2HkTD7g]
Tack cloth [amzn.to/ 2HzCzcv]
Water-based polyurethane [amzn.to/ 2W8Ivmc]
Steps:
1. Start by sanding down the area around the burn mark in the direction of the grain using 150 grit sandpaper until bare wood is visible again and the burn mark disappears. Sand a decent area around the burn mark to ensure that the floor doesn’t end up being too deep in the one area just around the mark.
2. Switch to 180 grit sandpaper and repeat the process.
3. Grab the sanding block and fine tune the area sanded with a piece of 220 grit sandpaper.
4. Clean the area with a tack cloth until it’s completely dust free.
5. Pour the polyurethane into a paint bucket. Gently apply the polyurethane to the floor using a paintbrush. Start in the middle and feather it out as your work towards the edges of the sanded floor.
6. Let the polyurethane dry for an hour and give the floor another light sanding with the 220 grit sandpaper.
7. Wipe the additional dust down with the tack cloth and then apply the second coat of polyurethane.
8. Repeat this process for the third coat.
Resources:
To repair a burn mark in the floor, Nathan recommends sanding down the floor past the burn mark and then refinishing the floor. If the floor has any stain on it, it may be difficult to match to the original.
In this case, Nathan was able to sand down the floors using a Rotex 90 random orbital sander, manufactured by Festool [amzn.to/ 2EethC5]. He did a few, wide passes using 150, 180, and 220 grit sandpaper. Between passes, Nathan used tack cloth to remove any sawdust that wasn’t picked up by the vacuum. These can be found at home centers.
For the finish, Nathan used a Varathane clear water-based polyurethane in a semi-gloss finish, which is manufactured by Rust-Oleum [amzn.to/ 2W8Ivmc]
The other materials Nathan used for the project, including the paintbrush and the paint bucket, can be found at home centers.
Expert assistance with this segment was provided by Nathan Gilbert Carpentry.
Ask This Old House TV
Homeowners have a virtual truckload of questions for us on smaller projects, and we're ready to answer. Ask This Old House solves the steady stream of home improvement problems faced by our viewers—and we make house calls! Ask This Old House features some familiar faces from This Old House, including Kevin O'Connor, general contractor Tom Silva, plumbing and heating expert Richard Trethewey, and landscape contractor Roger Cook.
This Old House releases new segments every Sunday, Monday, Wednesday and Friday.
Keywords: This Old House, How-to, home improvement, DIY, ask this old house, nathan gilbert, floor, burn mark, repair
Watch the full episode: www.thisoldhouse.com/ watch/ scorched-floor-hardy-plantings-ask-toh
Follow This Old House and Ask This Old House:
Facebook: www.facebook.com/ ThisOldHouse
Twitter: twitter.com/ thisoldhouse
twitter.com/ asktoh
Pinterest: www.pinterest.com/ thisoldhouse/
G+: plus.google.com/ +thisoldhouse/ posts
Instagram: instagram.com/ thisoldhouse
Tumblr: thisoldhouse.tumblr.com/
Tags:
|
Length: |
min.
|
|
Category: |
|
|
Rating: | 0.00
|
|
|
|
Click to Play Video

|
How to Use a Table Saw
May 19, 2019
Ask This Old House general contractor Tom Silva gives a general overview of a table saw and the best techniques to use it safely and effectively.
Click here to SUBSCRIBE to the official This Old House YouTube channel: www.youtube.com/ subscription_center?add_user=thisoldhouse
Cost: $500
Skill Level: Moderate to Advanced
Steps:
1. Modern table saws come with a variety of safety features to ensure safe use.
a. Table saw guards – plastic shields that help keep the dust down and act as an additional barrier between you and the blade.
b. Riving knife – two blades on both sides of table saw blade. Their teeth point in the opposite direction so that if the piece of wood kicks back, the teeth will bite down and prevent them from shooting out of the table saw.
2. There are a handful of cuts that can be made with a table saw.
a. Rip cut – cuts made with the grain of the wood.
i. Before making any cuts, ensure the rip fence on the side is perfectly lined up with the blade. Do this by measuring the distance between the rip fence and one tooth on the blade on one end of the rip fence, then turn that same tooth towards the other side of the table and measure again. If you get the same number, the rip fence is perfectly lined up.
ii. Set the height of the saw blade using the crank to a height just slightly above the thickness of whatever wood is being cut.
iii. When making a rip cut, watch the rip fence on the side instead of the blade to ensure you’re making a straight cut.
b. Cross cut – cuts made against the grain of the wood.
i. Do not use the rip fence when making cross cuts. It can cause kickback, and if it does, your hand is likely to get dragged across the blade based on the way you hold the board for cross cuts.
ii. Insert the cross cutting guide into the groove on the table saw and use that as a guide to make a cross cut.
iii. To make multiple cross cuts the same length, attach a scrap piece of wood to the rip fence and set the distance between the scrap and the blade to the desired length. That way, you can use the rip fence as a measuring guide without having the board against the rip fence.
Resources:
Tom demonstrated some best practices and techniques on the M18 Fuel Table Saw w/ One Key [amzn.to/ 2Q61zw4], which is manufactured by Milwaukee Tools [amzn.to/ 2HoNLKt].
Tom also mentioned the larger table saw he uses in the workshop, which is a SawStop Professional Cabinet Saw [amzn.to/ 2YzuwDz].
Ask This Old House TV
Homeowners have a virtual truckload of questions for us on smaller projects, and we're ready to answer. Ask This Old House solves the steady stream of home improvement problems faced by our viewers—and we make house calls! Ask This Old House features some familiar faces from This Old House, including Kevin O'Connor, general contractor Tom Silva, plumbing and heating expert Richard Trethewey, and landscape contractor Roger Cook.
This Old House releases new segments every Sunday, Monday, Wednesday and Friday.
Keywords: This Old House, How-to, home improvement, DIY, ask this old house, tom silva, kevin o'connor, table saw, safety
Watch the full episode: www.thisoldhouse.com/ watch/ scorched-floor-hardy-plantings-ask-toh
Follow This Old House and Ask This Old House:
Facebook: www.facebook.com/ ThisOldHouse
Twitter: twitter.com/ thisoldhouse
twitter.com/ asktoh
Pinterest: www.pinterest.com/ thisoldhouse/
G+: plus.google.com/ +thisoldhouse/ posts
Instagram: instagram.com/ thisoldhouse
Tumblr: thisoldhouse.tumblr.com/
Tags:
|
Length: |
min.
|
|
Category: |
|
|
Rating: | 0.00
|
|
|
|
Click to Play Video

|
Pro2Pro Livestream: Focus on Siding
May 14, 2019
Join us live on Tuesday, May 14th from the jobsite of our 2019 Idea House in New Canaan, Connecticut, where TOH Host Kevin O’Connor will meet up with lead carpenter Gordon Jacobsen of Karp Associates. Watch along as Jacobsen shares his crew’s technique for installing siding efficiently and accurately. There will be a Q&A session as well.
This livestream will run from 1:00pm to approximately 1:30pm EST.
Tags:
|
Length: |
min.
|
|
Category: |
|
|
Rating: | 0.00
|
|
|
|
Click to Play Video

|
How to Maximize Comfort with a Thermostat
May 17, 2019
Ask This Old House plumbing and heating expert Richard Trethewey and home technology expert Ross Trethewey discuss improvements to thermostats and how they contribute to comfort in a home.
Click here to SUBSCRIBE to the official This Old House YouTube channel: www.youtube.com/ subscription_center?add_user=thisoldhouse
Cost: $200 and up
Shopping List:
Smart thermostat [amzn.to/ 2PRfl5w]
Steps:
1. Richard and Ross emphasize that the thermostat temperature is just one measurement in the category of comfort. In their field, they work to ensure that the environment is comfortable based on the following data points:
a. Temperature – is the space warm or cool enough
b. Humidity – is there too much (or not enough) moisture in the air
c. Air Speed – is the general air flow of the house causing the occupants to feel colder than they should?
d. Mean radiant temperature – are there surfaces in the room (like windows, floor tiles, etc.) that are different from the occupants’ body temperatures that are making them feel warmer or colder?
2. Modern thermostats, when combined with smarter furnaces or boilers, can account for more of these factors to make the home more comfortable.
Resources:
While Richard and Ross emphasize that temperature is just one measure of comfort in a home, they also point out that innovations in new thermostats are allowing room temperatures to be more precise and more effective than in the past.
To demonstrate this, they referenced a variety of different thermostats, including the Nest Learning Thermostat (amzn.to/ 2H6bSNQ) and the Ecobee 4 Smart Thermostat (amzn.to/ 2JoDTBN), which can be found at most home centers.
Ask This Old House TV
Homeowners have a virtual truckload of questions for us on smaller projects, and we're ready to answer. Ask This Old House solves the steady stream of home improvement problems faced by our viewers—and we make house calls! Ask This Old House features some familiar faces from This Old House, including Kevin O'Connor, general contractor Tom Silva, plumbing and heating expert Richard Trethewey, and landscape contractor Roger Cook.
This Old House releases new segments every Sunday, Monday, Wednesday and Friday.
Keywords: This Old House, How-to, home improvement, DIY, ask this old house, richard trethewey, ross trethewey, kevin o'connor, smart thermostat, thermostat, heating
Watch the full episode: www.thisoldhouse.com/ watch/ restore-fireplace-porch-swing-ask-toh
Follow This Old House and Ask This Old House:
Facebook: www.facebook.com/ ThisOldHouse
Twitter: twitter.com/ thisoldhouse
twitter.com/ asktoh
Pinterest: www.pinterest.com/ thisoldhouse/
G+: plus.google.com/ +thisoldhouse/ posts
Instagram: instagram.com/ thisoldhouse
Tumblr: thisoldhouse.tumblr.com/
Tags:
|
Length: |
min.
|
|
Category: |
|
|
Rating: | 0.00
|
|
|
|
Click to Play Video

|
How to Restore a Historic Fireplace
May 15, 2019
Ask This Old House mason Mark McCullough delicately restores a damaged, historic fireplace that is built with custom, nearly irreplaceable bricks.
Click here to SUBSCRIBE to the official This Old House YouTube channel: www.youtube.com/ subscription_center?add_user=thisoldhouse
Time: 6-8 hours
Cost: $100 and up
Skill Level: Expert
Tools List for Restoring a Fireplace:
Margin trowel [amzn.to/ 2J6KCAU]
Flat jointer [amzn.to/ 2PUbkNN]
Mixing bucket [amzn.to/ 2LsQ5nG]
Shopping List:
Masonite [amzn.to/ 2JonBZK]
2x4” boards [amzn.to/ 2WwmWJo]
Type N mortar mix [amzn.to/ 2DUNLj4]
Restoration sand
Red dye for mortar [amzn.to/ 2LuRQkd]
Steps:
1. Start by adding support to the arch of the fireplace with a piece of Masonite and a few pieces of 2x4”, cut to size. Hammer them into place until the Masonite feels fully supported.
2. Identify the bricks that have fallen out of place or settled and plan to remove only the ones that need readjustment.
3. Carefully remove the old mortar holding the bricks. High quality, older masonry jobs used significantly thinner joints, so if a chisel doesn’t fit, try a margin trowel or a flat jointer.
4. Using the back of the trowel, gently tap the brick to see if it will break the bond of the other bed joint surrounding the brick. Slide the trowel through that joint and remove the mortar there as well.
5. With all the mortar removed around the brick, carefully pull that brick out of the fireplace.
6. Repeat this process with all the bricks that have settled.
7. Mix a new batch of mortar to match the old stuff. For thinner joints, a custom mix with a thin aggregate may need to be used. The proportion should be one scoop of mortar to three scoops of sand. Add dye to the mix to match the original color. Add water until the mortar is roughly an oatmeal consistency.
8. Back and side butter the bricks with the mortar and slide them back into place.
9. Once the bricks are in the correct position, fill in the joints the way you normally would when repointing.
10. If the joints don’t match well enough, consider removing all the mortar and repointing the entire fireplace.
Resources:
For a job as complicated like this, only a select handful of masons might be willing to tackle the job. Be prepared to get the job turned down by a few before you find someone who is willing to do it.
To hold the arch in place while Mark extracted select bricks, Mark used a piece of masonite and scrap 2x4”s, which can be found at any home center.
To extract the brick from the ultra thin masonry joints, Mark used a margin trowel and a tuck pointer to try and slip between the two bricks. These can also be found at any home center on masonry supply store.
When Mark repointed the brick, he needed to use a special mix to match the original fireplace and also ensure that the aggregate with thin enough to slide through the small joints. To do so, he used a premixed Evolution N mortar with just Portland cement and lime in it, which is manufactured by Ciment Quebec (cimentquebec.com/ en_us/ ). For the aggregate, he mixed in a Number 70 Silica Sand, which is a thin restoration sand manufactured by Taggart Sand of Pawtucket, Rhode Island. To match the color of the original mortar, he also added a Series H Concentrated Mortar Color, which is manufactured by Solomon Colors, Inc. (www.solomoncolors.com/ ).
Ask This Old House TV
Homeowners have a virtual truckload of questions for us on smaller projects, and we're ready to answer. Ask This Old House solves the steady stream of home improvement problems faced by our viewers—and we make house calls! Ask This Old House features some familiar faces from This Old House, including Kevin O'Connor, general contractor Tom Silva, plumbing and heating expert Richard Trethewey, and landscape contractor Roger Cook.
This Old House releases new segments every Sunday, Monday, Wednesday and Friday.
Keywords: This Old House, How-to, home improvement, DIY, ask this old house, Mark McCullough, fireplace, brick, historic
Watch the full episode: www.thisoldhouse.com/ watch/ restore-fireplace-porch-swing-ask-toh
Follow This Old House and Ask This Old House:
Facebook: www.facebook.com/ ThisOldHouse
Twitter: twitter.com/ thisoldhouse
twitter.com/ asktoh
Pinterest: www.pinterest.com/ thisoldhouse/
G+: plus.google.com/ +thisoldhouse/ posts
Instagram: instagram.com/ thisoldhouse
Tumblr: thisoldhouse.tumblr.com/
Tags:
|
Length: |
min.
|
|
Category: |
|
|
Rating: | 0.00
|
|
|
|
Click to Play Video

|
Why is This Lawn Patchy?
May 13, 2019
Ask This Old House landscaper Roger Cook and landscape designer Jenn Nawada share some tips for killing weeds without hurting the lawn.
Click here to SUBSCRIBE to the official This Old House YouTube channel: www.youtube.com/ subscription_center?add_user=thisoldhouse
Cost: $20 and up
Skill Level: Beginner
Shopping List:
Weed killer
Steps:
1. Roger shares that the homeowner’s yard was patchy because she used a non-selective herbicide to treat for weeds in her lawn.
2. Read labels carefully to ensure the proper weed killer is being used. On a lawn, a selective herbicide should be used. On sidewalks and walkways, a non-selective herbicide can be used.
3. If there is a concern about the harsh nature of these chemicals, there are organic herbicides available that work pretty effectively.
Resources:
Roger and Jenn warned viewers to read the labeling on weed killers very carefully to make sure the correct product is being purchased, since they look very similar. They discussed both Roundup Weed Killer (amzn.to/ 2VWt5Sc) and Roundup for Lawns (amzn.to/ 2H7iJ9B), which are manufactured by RoundUp.
Roger also pointed out that he’s been a fan of using organic weed killers and mentioned Avenger Weed Killer (amzn.to/ 2H3NafG), which kills everything including the grass, and PureDefense Weed Shield, which is a selective herbicide that is manufactured by Purely Organic Products and is available at most home centers.
Expert assistance with this segment was provided by Nawada Landscape Design (www.nawadalandscapedesign.com/ ).
Ask This Old House TV
Homeowners have a virtual truckload of questions for us on smaller projects, and we're ready to answer. Ask This Old House solves the steady stream of home improvement problems faced by our viewers—and we make house calls! Ask This Old House features some familiar faces from This Old House, including Kevin O'Connor, general contractor Tom Silva, plumbing and heating expert Richard Trethewey, and landscape contractor Roger Cook.
This Old House releases new segments every Sunday, Monday, Wednesday and Friday.
Keywords: This Old House, How-to, home improvement, DIY, ask this old house, roger cook, jenn nawada, weeds, lawn care, herbicide
Watch the full episode: www.thisoldhouse.com/ watch/ restore-fireplace-porch-swing-ask-toh
Follow This Old House and Ask This Old House:
Facebook: www.facebook.com/ ThisOldHouse
Twitter: twitter.com/ thisoldhouse
twitter.com/ asktoh
Pinterest: www.pinterest.com/ thisoldhouse/
G+: plus.google.com/ +thisoldhouse/ posts
Instagram: instagram.com/ thisoldhouse
Tumblr: thisoldhouse.tumblr.com/
Tags:
|
Length: |
min.
|
|
Category: |
|
|
Rating: | 0.00
|
|
|
|
Click to Play Video

|
How to Hang a Porch Swing through Vinyl
May 12, 2019
Ask This Old House general contractor Tom Silva adds structure to a porch in order to safely hang a swing
Click here to SUBSCRIBE to the official This Old House YouTube channel: www.youtube.com/ subscription_center?add_user=thisoldhouse
Time: 3-4 hours
Cost: $200
Skill Level: Moderate
Tools List for Hanging a Porch Swing:
Hammer [amzn.to/ 2JmGkEY]
Prybar [amzn.to/ 2V9dVnU]
Wrench [amzn.to/ 2LvSduP]
Drill [amzn.to/ 302tbH0]
Shopping List:
Porch swing [amzn.to/ 2Yc7LFC]
2x4” boards [amzn.to/ 2WwmWJo]
Lag screws [amzn.to/ 2WvBJE6]
Wood screws [amzn.to/ 2H3m60f]
Thick drill bit [amzn.to/ 2JotRk7]
Thin drill bit [amzn.to/ 2VSntYV]
Steps:
1. Start by removing the vinyl ceiling using a hammer and a prybar up until the furthest point the swing will hang.
2. If the swing cannot be hung on structure, structure will need to be added. Cut the 2x4” to size and then hammer it into position, preferably over the furring strip (if there is one) to accommodate the additional ¾” depth it creates. Secure the structure with wood screws.
3. Reinstall the vinyl ceiling up until the panels fall just over the added structure.
4. Drill a pilot hole through the vinyl, the furring strip, and the added structure using the drill and a drill bit. To keep the vinyl from cracking, it helps to start with a thicker drill bit just for the vinyl, then switch to the thin drill bit to drill the rest of the hole.
5. Mount the bracket that comes with the swing to the pilot holes. Hand tighten the bracket through the pilot hole using a lag screw and a wrench.
6. Install the vinyl ceiling up until the next location for the other side of the swing and repeat the process.
7. Install the rest of the vinyl ceiling.
8. Hang the swing onto the mounting brackets.
Resources:
Depending on which direction you’d like to hang the porch swing, additional structure may need to be added to ensure the swing is installed safely.
To add structure, Tom took a piece of 2x4” and hammered it into place. He then secured it with wood screws. To secure the brackets from the swing, Tom used lag screws. All of these tools and hardware can be found at home centers.
The swing the homeowners had picked out was the Coral Coast Casco Bay Resin Wicker Porch Swing with Optional Cushion, which comes from Hayneedle (amzn.to/ 2Yc7LFC). The swing comes with the green hanging brackets, but does not come with hardware to attach the brackets to the ceiling.
Ask This Old House TV
Homeowners have a virtual truckload of questions for us on smaller projects, and we're ready to answer. Ask This Old House solves the steady stream of home improvement problems faced by our viewers—and we make house calls! Ask This Old House features some familiar faces from This Old House, including Kevin O'Connor, general contractor Tom Silva, plumbing and heating expert Richard Trethewey, and landscape contractor Roger Cook.
This Old House releases new segments every Sunday, Monday, Wednesday and Friday.
Keywords: This Old House, How-to, home improvement, DIY, ask this old house, tom silva, porch swing, vinyl siding, porch, install
Watch the full episode: www.thisoldhouse.com/ watch/ restore-fireplace-porch-swing-ask-toh
Follow This Old House and Ask This Old House:
Facebook: www.facebook.com/ ThisOldHouse
Twitter: twitter.com/ thisoldhouse
twitter.com/ asktoh
Pinterest: www.pinterest.com/ thisoldhouse/
G+: plus.google.com/ +thisoldhouse/ posts
Instagram: instagram.com/ thisoldhouse
Tumblr: thisoldhouse.tumblr.com/
Tags:
|
Length: |
min.
|
|
Category: |
|
|
Rating: | 0.00
|
|
|
|
Click to Play Video

|
Festool Random Orbit Sander
May 03, 2019
Not all random orbit sanders are created equal. In this episode of Tool School, Festool expert Brian Sedgeley shows Tom Silva how the two different sanding modes and dust extraction capability of the Rotex RO 150 can achieve great results.
Tags:
|
Length: |
min.
|
|
Category: |
|
|
Rating: | 0.00
|
|
|
|
Click to Play Video

|
How to Shorten a Gas Pipe to Fit an Oven
May 08, 2019
Ask This Old House plumbing and heating expert Richard Trethewey shortens a gas pipe for a homeowner whose new stove does not fit against the wall because it is getting stuck on the pipe.
Click here to SUBSCRIBE to the official This Old House YouTube channel: www.youtube.com/ subscription_center?add_user=thisoldhouse
Time: 2-3 hours
Cost: $50
Skill Level: Expert – for professionals only
Tools List for Shortening a Gas Pipe:
Open-ended adjustable wrench [amzn.to/ 2JeiYkV]
Pipe wrenches [amzn.to/ 2Lg5PKE]
Shopping List:
Pipe dope [amzn.to/ 2UTxfW2]
Leak detector test [amzn.to/ 2Wh26h5]
Steps:
1. Working with gas is dangerous and should be left to a licensed professional.
2. Start by shutting off the gas to the meter using a wrench.
3. Carefully slide the stove out until you can fit behind it to break the connections.
4. Disconnect the flexible gas line from the gas piping using the pipe wrenches.
5. With the pipe wrenches still in hand, loosen the gas piping and the shut off from the pipes below the floor. Since gas pipes usually go in before any finish work happens, there’s a chance that twisting the pipe will damage the wall a little behind it when the shut off begins to twist.
6. Unthread the gas pipe from the shut off valve.
7. Replace the gas pipe with a smaller pipe. Be sure to choose a size that’s long enough to reach all the way through the floor, but short enough to allow for the additional height of the flexible gas line to the stove. To thread the pipe, apply a generous coat of pipe dope to the threads and be sure to tighten it using the pipe wrenches.
8. With the shorter pipe secured to the gas shut off, apply more pipe dope to the thread on the other side of the short pipe. Send it back through the floor and tighten it to the rest of the gas line using the pipe wrenches. Be sure to tighten it until the gas shut off is parallel to the wall so you’re still able to access the shut off as needed.
9. Reconnect the flexible gas line from the stove to the shut off on the pipe. Slide the stove back into place.
10. Turn the gas back on. Test all the new work for leaks by applying a soap solution along all the new connections. If any bubbles form in the solution, it means air is escaping somewhere and the connections aren’t sealed tightly enough. If there are no bubbles, then the gas line is perfectly sealed.
Resources:
Richard emphasizes that working with gas is extremely dangerous and should be left to a licensed professional.
All of the tools and materials Richard used to shorten the gas pipe, including the replacement nipple, pipe dope, pipe wrenches, and the soap test, can all be found at home centers.
Ask This Old House TV
Homeowners have a virtual truckload of questions for us on smaller projects, and we're ready to answer. Ask This Old House solves the steady stream of home improvement problems faced by our viewers—and we make house calls! Ask This Old House features some familiar faces from This Old House, including Kevin O'Connor, general contractor Tom Silva, plumbing and heating expert Richard Trethewey, and landscape contractor Roger Cook.
This Old House releases new segments every Sunday, Monday, Wednesday and Friday.
Keywords: This Old House, How-to, home improvement, DIY, ask this old house, richard trethewey, pipes, plumbing, gas, oven, appliances, kitchen
Watch the full episode: www.thisoldhouse.com/ watch/ stair-treads-gas-stove-pipe-ask-toh
Follow This Old House and Ask This Old House:
Facebook: www.facebook.com/ ThisOldHouse
Twitter: twitter.com/ thisoldhouse
twitter.com/ asktoh
Pinterest: www.pinterest.com/ thisoldhouse/
G+: plus.google.com/ +thisoldhouse/ posts
Instagram: instagram.com/ thisoldhouse
Tumblr: thisoldhouse.tumblr.com/
Tags:
|
Length: |
min.
|
|
Category: |
|
|
Rating: | 0.00
|
|
|
|
Click to Play Video

|
How to Choose and Use Pruners
May 06, 2019
Ask This Old House landscape designer Jenn Nawada shares some tips about pruners.
Click here to SUBSCRIBE to the official This Old House YouTube channel: www.youtube.com/ subscription_center?add_user=thisoldhouse
Cost: $15-$30
Skill Level: Beginner
Tools:
Bypass pruners [amzn.to/ 2Y0uT9M]
Anvil pruners [amzn.to/ 2IUU1va]
Bucket [amzn.to/ 2PF7d8c]
Shopping List:
Bleach [amzn.to/ 2GTYMmG]
Steps:
1. Pruners get their names by the way they cut. The blades on the bypass pruners slide slightly pass each other, hence bypassing one another. The blades on anvil pruners perfectly line up and crush together when cut, like a hammer to an anvil.
2. Because of their intense cut, anvil pruners are stronger and great for cutting dead wood or bulk material. However, that strong cut can also damage the tissue of live plants, so it shouldn’t be used for delicate pruning.
3. Bypass pruners, on the other hand, can cut in a way that doesn’t damage the tissue of the plant and are perfect for precision cuts. When pruning, Jenn recommends looking for V’s in the plant and making the cuts there until the plant is shaped and healthy looking.
4. After pruning, Jenn recommends cleaning the pruners thoroughly to prevent them for transferring disease from one plant to another. To do this, take a small bucket of three parts water and one part bleach mixed together and swirl the pruners with the blades open in the solution. Then, wipe the blades down dry to prevent rusting.
Resources:
When it comes to pruning, Jenn prefers to use a pair of bypass pruning shears, which are manufactured by ARS (amzn.to/ 2V6miFH). For cutting back dead wood and bulkier items where a precision cut isn’t needed, anvil pruners will get the job done faster. The pair Jenn demonstrated are a pair of Fiskars anvil pruners (amzn.to/ 2Wdn944).
Expert assistance with this segment was provided by Nawada Landscape Design (www.nawadalandscapedesign.com/ ).
Ask This Old House TV
Homeowners have a virtual truckload of questions for us on smaller projects, and we're ready to answer. Ask This Old House solves the steady stream of home improvement problems faced by our viewers—and we make house calls! Ask This Old House features some familiar faces from This Old House, including Kevin O'Connor, general contractor Tom Silva, plumbing and heating expert Richard Trethewey, and landscape contractor Roger Cook.
This Old House releases new segments every Sunday, Monday, Wednesday and Friday.
Keywords: This Old House, How-to, home improvement, DIY, ask this old house, jenn nawada, kevin o'connor, pruners, landscaping, gardening, tools
Watch the full episode: www.thisoldhouse.com/ watch/ stair-treads-gas-stove-pipe-ask-toh
Follow This Old House and Ask This Old House:
Facebook: www.facebook.com/ ThisOldHouse
Twitter: twitter.com/ thisoldhouse
twitter.com/ asktoh
Pinterest: www.pinterest.com/ thisoldhouse/
G+: plus.google.com/ +thisoldhouse/ posts
Instagram: instagram.com/ thisoldhouse
Tumblr: thisoldhouse.tumblr.com/
Tags:
|
Length: |
min.
|
|
Category: |
|
|
Rating: | 0.00
|
|
|
|
Click to Play Video

|
How to Update Oak Stair Treads and Risers
May 05, 2019
Ask This Old House general contractor Tom Silva teaches a homeowner how to replace split-level stair treads in his midcentury modern home
Click here to SUBSCRIBE to the official This Old House YouTube channel: www.youtube.com/ subscription_center?add_user=thisoldhouse
Time: 10-12 hours
Cost: $300
Skill Level: Moderate
Tools List for Updating Stair Treads and Risers:
Prybar [amzn.to/ 2USuhBl]
Reciprocating saw [amzn.to/ 2IUBdwi]
Hammer [amzn.to/ 2UPkY5e]
Utility knife [amzn.to/ 2XXQuzJ]
Pencil [amzn.to/ 2vyVUFb]
Combination square [amzn.to/ 2vvxUTt]
Circular saw [amzn.to/ 2PG4kEf]
Router [amzn.to/ 2J4wGXc]
Palm sander [amzn.to/ 2vteHBZ]
Scissors [amzn.to/ 2PEMmlm]
Roller [amzn.to/ 2vtewGO]
Caulking gun [amzn.to/ 2Y0q1l0]
Rubber mallet [amzn.to/ 2GPBVHB]
Brad nailer [amzn.to/ 2GUkB4a]
Air compressor [amzn.to/ 2DGrlSo]
Shopping List:
¾” Oak stair treads [amzn.to/ 2Le6tbu]
4x8’ oak veneer sheet [amzn.to/ 2GRuNdK]
4” or longer metal cutting blade for reciprocating saw [amzn.to/ 2ITomKI]
Shims [amzn.to/ 2GVFI7p]
Wood glue [amzn.to/ 2XWu9CH]
Temporary floor protection [amzn.to/ 2vvdERU]
Sandpaper [amzn.to/ 2ZQ7d9V]
Construction adhesive [amzn.to/ 2GVAQiA]
8d finish nails [amzn.to/ 2GWAjgD]
Resources:
While the risers could have also been replaced, Tom thought it would be easier and just as effective to apply a veneer over them to give them a cleaner look that matched the new treads. Tom applied a pressure backed 20 PSA red oak veneer, which is manufactured by Veneer Technologies (amzn.to/ 2ITqr9u). He ordered one 4’x8’ sheet for the whole set of stairs.
For the template, Tom used an extra piece of Ram Board temporary floor protection (amzn.to/ 2Wd23Tg), though any semi-rigid markable material would work.
To secure the treads in place, Tom used 8d finish nails and construction adhesive, which is manufactured by Gorilla Glue (amzn.to/ 2GVAQiA).
Expert assistance with this segment was provided by Atlantic Plywood (atlanticplywood.com/ ).
Ask This Old House TV
Homeowners have a virtual truckload of questions for us on smaller projects, and we're ready to answer. Ask This Old House solves the steady stream of home improvement problems faced by our viewers—and we make house calls! Ask This Old House features some familiar faces from This Old House, including Kevin O'Connor, general contractor Tom Silva, plumbing and heating expert Richard Trethewey, and landscape contractor Roger Cook.
This Old House releases new segments every Sunday, Monday, Wednesday and Friday.
Keywords: This Old House, How-to, home improvement, DIY, tom silva, stairs, ask this old house
Watch the full episode: www.thisoldhouse.com/ watch/ stair-treads-gas-stove-pipe-ask-toh
Follow This Old House and Ask This Old House:
Facebook: www.facebook.com/ ThisOldHouse
Twitter: twitter.com/ thisoldhouse
twitter.com/ asktoh
Pinterest: www.pinterest.com/ thisoldhouse/
G+: plus.google.com/ +thisoldhouse/ posts
Instagram: instagram.com/ thisoldhouse
Tumblr: thisoldhouse.tumblr.com/
Tags:
|
Length: |
min.
|
|
Category: |
|
|
Rating: | 0.00
|
|
|
|
Click to Play Video

|
How to Flatten a Textured Ceiling
May 03, 2019
Ask This Old House painter Mauro Henrique smooths over a textured ceiling using joint compound.
Click here to SUBSCRIBE to the official This Old House YouTube channel: www.youtube.com/ subscription_center?add_user=thisoldhouse
Time: 6-8 hours
Cost: $200
Skill Level: Moderate
Tools List for Flattening a Textured Ceiling:
Safety glasses [amzn.to/ 2USGrKj]
Ladder or staging [amzn.to/ 2Va9MoE]
Buckets [amzn.to/ 2UTm8fM]
Drill driver [amzn.to/ 2IRufYP]
Mixing drill bit [amzn.to/ 2J40hjL]
Taping knife [amzn.to/ 2ITdPiE]
Hawk [amzn.to/ 2ITepgk]
Shopping List:
Joint compound [amzn.to/ 2VGRWZO]
Plastic drop cloths [amzn.to/ 2ZPU6FG]
Canvas drop cloths [amzn.to/ 2Le0Fic]
Painter’s tape [amzn.to/ 2GMJ4IS]
Rags [amzn.to/ 2IVcs35]
220 grit sandpaper [amzn.to/ 2PCMKAX]
Steps:
1. Start by protecting the entire room with drop cloths. On the floor, use a canvas drop cloth. On the walls, use the plastic drop cloth. It isn’t necessary to cover the entire wall, just the top third.
2. Wipe down the ceiling with a damp rag to ensure it’s clean.
3. Mix the joint compound in a bucket using water and the drill with a mixing bit on it until it’s roughly thicker than a cake batter consistency.
4. Add some joint compound to the hawk. Scoop a small amount of the joint compound off the hawk using the taping knife, and then apply it in thin, smooth coats over the textured ceiling. This technique requires multiple coats, so don’t feel the need to fill in all the low spots on the first pass.
5. Wait roughly 45 minutes for the first coat to dry. Then, add a second coat.
6. Repeat this process until all the low spots are filled in and the ceiling is flat. It shouldn’t take more than 2-3 coats.
7. After 24 hours, lightly sand the ceiling using 220 grit sandpaper.
8. After the sanding, the ceiling will be ready for paint. Mauro recommends a flat, white paint for the ceiling.
Resources:
While scraping a textured ceiling is a common tactic to achieve a flat ceiling, Mauro suggests that in some cases, it’s a lot easier to smooth over the texture with joint compound than to scrape it off.
While a step ladder works fine for this project, Mauro finds it’s much easier and also safer to use staging to reach the ceiling. This can be rented from home centers.
Mauro used Sheetrock Easy Sand 45 joint compound, which is manufactured by USG (amzn.to/ 2VGRWZO). Mauro thinks this product works well in this application because it dries in a reasonable amount of time, while still giving you a little flexibility to really work with it and apply it smoothly to the ceiling.
The other tools Mauro used for the job, including the drill with the mixing bit, taping knife, hawk, and drop cloths can all be found at home centers.
Expert assistance with this segment was provided by Mauro’s Painting (maurospainting.com/ ).
Ask This Old House TV
Homeowners have a virtual truckload of questions for us on smaller projects, and we're ready to answer. Ask This Old House solves the steady stream of home improvement problems faced by our viewers—and we make house calls! Ask This Old House features some familiar faces from This Old House, including Kevin O'Connor, general contractor Tom Silva, plumbing and heating expert Richard Trethewey, and landscape contractor Roger Cook.
This Old House releases new segments every Sunday, Monday, Wednesday and Friday.
Keywords: This Old House, How-to, home improvement, DIY, ask this old house, mauro henrique, ceiling, painting, plaster, joint compound
Watch the full episode: www.thisoldhouse.com/ watch/ fix-foundation-textured-ceiling-ask-toh
Follow This Old House and Ask This Old House:
Facebook: www.facebook.com/ ThisOldHouse
Twitter: twitter.com/ thisoldhouse
twitter.com/ asktoh
Pinterest: www.pinterest.com/ thisoldhouse/
G+: plus.google.com/ +thisoldhouse/ posts
Instagram: instagram.com/ thisoldhouse
Tumblr: thisoldhouse.tumblr.com/
Tags:
|
Length: |
min.
|
|
Category: |
|
|
Rating: | 0.00
|
|
|
|
Click to Play Video

|
How to Safely Dispose of Oily Rags
May 01, 2019
Ask This Old House general contractor Tom Silva discusses the proper disposal techniques for oily rags to prevent spontaneous combustion.
Click here to SUBSCRIBE to the official This Old House YouTube channel: www.youtube.com/ subscription_center?add_user=thisoldhouse
Time: 1-2 hours
Skill Level: Beginner
Steps:
1. Whenever using oil-based finishes, it’s important to properly dispose of the application tools to prevent spontaneous combustion. It really does happen – it even happened to Tom Silva!
2. Once the rag is no longer in use, soak it in a bucket of water. Then, wring out the rag and allow it to dry flat, preferably outside.
3. The key is to keep anything from smothering the rag as it dries, since it releases heat as it dries which can raise the temperature of the rag or the thing on top of it to a high enough temperature that it can combust.
4. Once the rag is completely dried out, it’s safe to throw away. Tom suggests disposing of it in an outdoor trash can rather than in the house. Better to be safe than sorry!
Resources:
Tom explains that as long as rags are left uncovered by other objects and are allowed to dry flat, they do not pose the risk of spontaneous combustion. For extra caution, Tom likes to soak them in water and then allow them to dry flat. The buckets and empty paint can he showed in the segment can both be found at home centers.
Ask This Old House TV
Homeowners have a virtual truckload of questions for us on smaller projects, and we're ready to answer. Ask This Old House solves the steady stream of home improvement problems faced by our viewers—and we make house calls! Ask This Old House features some familiar faces from This Old House, including Kevin O'Connor, general contractor Tom Silva, plumbing and heating expert Richard Trethewey, and landscape contractor Roger Cook.
This Old House releases new segments every Sunday, Monday, Wednesday and Friday.
Keywords: This Old House, How-to, home improvement, DIY, tom silva, ask this old house, kevin o'connor, safety, health, rags, disposal
Watch the full episode: www.thisoldhouse.com/ watch/ fix-foundation-textured-ceiling-ask-toh
Follow This Old House and Ask This Old House:
Facebook: www.facebook.com/ ThisOldHouse
Twitter: twitter.com/ thisoldhouse
twitter.com/ asktoh
Pinterest: www.pinterest.com/ thisoldhouse/
G+: plus.google.com/ +thisoldhouse/ posts
Instagram: instagram.com/ thisoldhouse
Tumblr: thisoldhouse.tumblr.com/
Tags:
|
Length: |
min.
|
|
Category: |
|
|
Rating: | 0.00
|
|
|
|
Click to Play Video

|
How to Repoint and Prevent Further Damage to a Fieldstone Foundation
Apr 29, 2019
Ask This Old House mason Mark McCullough repoints a crumbling fieldstone foundation and shares an important lesson about water management on the outside of the house
Click here to SUBSCRIBE to the official This Old House YouTube channel: www.youtube.com/ subscription_center?add_user=thisoldhouse
Time: 2-3 hours
Cost: $50
Skill Level: Moderate
Tools List for Repointing a Fieldstone Foundation:
Bucket [amzn.to/ 2V4bU16]
Masonry brush [amzn.to/ 2Lf6Liq]
Safety glasses [amzn.to/ 2Wg9pFF]
Pickax [amzn.to/ 2vwVvTY]
Cement finishing trowel [amzn.to/ 2URmG5Q]
Gauging trowel [amzn.to/ 2UVdQo1]
Brick trowel [amzn.to/ 2ISYO06]
Paintbrush [amzn.to/ 2J533Fi]
Shopping List:
Type N mortar [amzn.to/ 2GUd9Gy]
Bonding agent [amzn.to/ 2Y0ZOTI]
Steps:
1. Start by identifying the cause of the foundation damage. Go outside to the corresponding location near the damage in the basement. Check to see if there is proper drainage, grading, and a functional gutter system. If water is able to pool anywhere near the area in question, the foundation damage will return.
2. Address any water issues on the outside of the house to prevent additional water from coming in.
3. Dip a masonry brush in a bucket of water and dampen the mortar and stones that are going to be repointed to keep the dust down.
4. Use a pickax or another sharp tool to pull the existing mortar from between the stones. If small stones fall out, set them aside to be put back in place during repointing.
5. Once all the mortar is removed, dip the masonry brush back in the water and clean out all the joints.
6. Using a separate bucket, mix the mortar, water, and the bonding agent.
7. Holding the cement finishing trowel upside down, plop some mortar on its blade. Use a margin trowel to push the mortar off the cement finishing trowel and deep into the joints of the fieldstone foundation. Put the small stones back in where there are really large areas to fill in. Do this until all the joints are filled with mortar and small stones.
8. Using a small, wet paintbrush, smooth over all the joints to expose the aggregate. Check underneath all the stones and makes sure no sagging has happened between the mortar joints and the stones. If that’s happened, use the paintbrush to push the mortar back up against the stones.
Resources:Mark emphasizes that if you suspect water damage in your basement, it’s just as important to identify and eliminate the cause of the water as it is to repoint the basement. He explains that having a good gutter and overall drainage system is essential to preventing further foundation damage to a house. Gutters and downspouts can be found at home centers.
To repoint the fieldstone foundation, Mark used a Type N mortar, manufactured by Quikrete (amzn.to/ 2GUd9Gy). In general, Type S mortar is used for structural or foundation work, but Mark finds that the Type N works better in this application because it's softer and will accommodate some movement in the foundation. To help the mortar bond better with the stones, Mark also added C-21 All Acrylic cement modifier admix, which is manufactured by Silpro (www.silpro.com/ ).
The other tools Mark used to repoint the foundation, including the buckets and trowels, can all be found at home centers and masonry supply stores.
Expert assistance with this segment was provided by MJM Masonry.
Ask This Old House TV
Homeowners have a virtual truckload of questions for us on smaller projects, and we're ready to answer. Ask This Old House solves the steady stream of home improvement problems faced by our viewers—and we make house calls! Ask This Old House features some familiar faces from This Old House, including Kevin O'Connor, general contractor Tom Silva, plumbing and heating expert Richard Trethewey, and landscape contractor Roger Cook.
This Old House releases new segments every Sunday, Monday, Wednesday and Friday.
Keywords: This Old House, How-to, home improvement, DIY, ask this old house, Mark McCullough, fieldstone, foundation, masonry, water damage, repointing
Watch the full episode: www.thisoldhouse.com/ watch/ fix-foundation-textured-ceiling-ask-toh
Follow This Old House and Ask This Old House:
Facebook: www.facebook.com/ ThisOldHouse
Twitter: twitter.com/ thisoldhouse
twitter.com/ asktoh
Pinterest: www.pinterest.com/ thisoldhouse/
G+: plus.google.com/ +thisoldhouse/ posts
Instagram: instagram.com/ thisoldhouse
Tumblr: thisoldhouse.tumblr.com/
Tags:
|
Length: |
min.
|
|
Category: |
|
|
Rating: | 0.00
|
|
|
|
Click to Play Video

|
How to Plan for Spring Bulbs
Apr 28, 2019
Ask This Old House landscape contractor Roger Cook and landscape designer Jenn Nawada share some tips for planting Spring bulbs.
Click here to SUBSCRIBE to the official This Old House YouTube channel: www.youtube.com/ subscription_center?add_user=thisoldhouse
Cost: $15-$30
Skill Level: Beginner
Steps:
1. Planning for Spring bulbs should start in the Fall. If you miss the Fall, it’s best to wait until the following year to plant bulbs.
2. Consider the look you want for the bulbs. For a structured, varied look, read the labels carefully and organize the bulbs by bloom time, height, and color. This ensures a variety of color and flowers all throughout the Spring.
3. For a more natural, wild look, try throwing the bulbs in the area you want to plant them. Wherever they land, plant them there.
4. For a stronger impact, try planting multiple bulbs in the same hole.
Resources:
Expert assistance with this segment was provided by Nawada Landscape Design (www.nawadalandscapedesign.com/ ).
Ask This Old House TV
Homeowners have a virtual truckload of questions for us on smaller projects, and we're ready to answer. Ask This Old House solves the steady stream of home improvement problems faced by our viewers—and we make house calls! Ask This Old House features some familiar faces from This Old House, including Kevin O'Connor, general contractor Tom Silva, plumbing and heating expert Richard Trethewey, and landscape contractor Roger Cook.
This Old House releases new segments every Sunday, Monday, Wednesday and Friday.
Keywords: This Old House, How-to, home improvement, DIY, ask this old house, Roger Cook, Jenn Nawada, Kevin O'Connor, Spring, bulbs, flowers, garden, yard, landscaping
Watch the full episode: www.thisoldhouse.com/ watch/ fix-foundation-textured-ceiling-ask-toh
Follow This Old House and Ask This Old House:
Facebook: www.facebook.com/ ThisOldHouse
Twitter: twitter.com/ thisoldhouse
twitter.com/ asktoh
Pinterest: www.pinterest.com/ thisoldhouse/
G+: plus.google.com/ +thisoldhouse/ posts
Instagram: instagram.com/ thisoldhouse
Tumblr: thisoldhouse.tumblr.com/
Tags:
|
Length: |
min.
|
|
Category: |
|
|
Rating: | 0.00
|
|
|
|
Click to Play Video

|
How to Build Wainscot: Get the Panel Size Right
Apr 23, 2019
An attendee asks: How do you determine the size of the panels? Custom home builder and master craftsman Gary Striegler explains. Kevin O’Connor hosts. This segment was previously recorded live at JLC Live in Providence, RI on March 29th, 2019
ne.jlclive.com/ en/ home.html
Kevin O’Connor: @kevinoconnortoh
Gary Striegler: @craftsmanbuilders
Brent Shively: @festoolshives
Festool USA: @festoolusa
This Old House Pro2Pro: @pro2protoh
WindsorOne: @windsorone
JLC Live: @jlclive
Pro2Pro is a hub designed especially for people who work in the skilled trades
Tags:
|
Length: |
min.
|
|
Category: |
|
|
Rating: | 0.00
|
|
|
|
Click to Play Video

|
How to Build Wainscot: Panels on the Ceiling
Apr 23, 2019
A viewer asks: What’s the difference between wainscot and coffers? Custom home builder and master craftsman Gary Striegler answers. Kevin O’Connor hosts. This segment was previously recorded live at JLC Live in Providence, RI on March 29th, 2019
ne.jlclive.com/ en/ home.html
Kevin O’Connor: @kevinoconnortoh
Gary Striegler: @craftsmanbuilders
Brent Shively: @festoolshives
Festool USA: @festoolusa
This Old House Pro2Pro: @pro2protoh
WindsorOne: @windsorone
JLC Live: @jlclive
Pro2Pro is a hub designed especially for people who work in the skilled trades
Tags:
|
Length: |
min.
|
|
Category: |
|
|
Rating: | 0.00
|
|
|
|
Click to Play Video

|
How to Build Wainscot: Where to Start the Layout
Apr 23, 2019
An attendee asks: Where do you start in a room? Custom home builder and master craftsman Gary Striegler answers. Kevin O’Connor hosts. This segment was previously recorded live at JLC Live in Providence, RI on March 29th, 2019
ne.jlclive.com/ en/ home.html
Kevin O’Connor: @kevinoconnortoh
Gary Striegler: @craftsmanbuilders
Brent Shively: @festoolshives
Festool USA: @festoolusa
This Old House Pro2Pro: @pro2protoh
WindsorOne: @windsorone
JLC Live: @jlclive
Pro2Pro is a hub designed especially for people who work in the skilled trades
Tags:
|
Length: |
min.
|
|
Category: |
|
|
Rating: | 0.00
|
|
|
|
|
|


